


Admin offboarding checklist
Admin Offboarding Checklist
If a key admin is leaving your company or changing roles, follow this checklist to prevent billing issues and maintain admin continuity. This is required if the person leaving is a:
- Billing Owner
- Workspace Admin
- Domain Admin
- Technical Contact
- Bank Account Owner
Important: This checklist applies only when a Workspace Admin or Domain Admin is being offboarded.
- If you’re adding a new Workspace Admin or Domain Admin while others remain active, not all steps are required.
- All steps must be completed if the sole Workspace Admin or billing owner is leaving the company.
Note: If you’re only taking over billing or payment management, follow these steps to switch billing owners and add a payment account. You don’t need the full checklist.
How to assign a new Workspace Admin
If you’re a current Workspace Admin, follow these steps to give another person access before you leave.
Note: The new Workspace Admin must be added to all company workspaces to keep billing under a single subscription. If the former admin retains ownership of any workspace, billing may split across separate subscriptions.
How to assign a new Domain Admin
If your company uses Expensify Cards, domain groups, or SAML, the Domain Admin role must also be reassigned.
As a Domain Admin:
- Go to Settings > Domains > [Domain Name] > Domain Members.
- Click Add Admin, then enter the new admin’s email.
- Confirm that the new admin appears in the Domain Admins list.
Note:
Domain Admins control company-wide permissions and card feeds, so this step is required before offboarding the previous Domain Admin.
How to share a business bank account with a new Workspace Admin
If you’re the current bank account owner in Expensify, share the bank account with the new Workspace Admin or another Workspace Admin so they can continue reimbursements and payments.
How to take over billing and payment responsibilities
If you’re the new Workspace Admin taking over billing and payment responsibilities, follow these steps to transfer workspace ownership and payment details.
- Follow the steps to become the Billing Owner and add a payment method.
- Make sure your payment details are valid to prevent service interruption.
Note: The new Workspace Admin must transfer ownership of all company workspaces to consolidate billing under a single Billing Owner. If the former admin remains Billing Owner on any workspace, billing may split across multiple subscriptions.
How to verify a shared business bank account
If the former Workspace Admin shared a business bank account with you, follow these steps to complete verification as a new Workspace Admin:
- Wait 1–2 business days for test transactions (two withdrawals and one deposit) to appear.
- Go to Settings > Account > Wallet.
- Enter the test transaction amounts to complete verification.
Note: Only the person who sees the test transactions in their bank can complete the verification.
How to revoke the former Workspace Admin’s access to a verified bank account
Once the shared bank account is verified by the new Workspace Admin, they can revoke the previous admin’s access to maintain secure control.
Note: If you can’t unshare the account because the previous admin is still the Expensify Card settlement account owner, contact Concierge or your Account Manager to update the ownership.
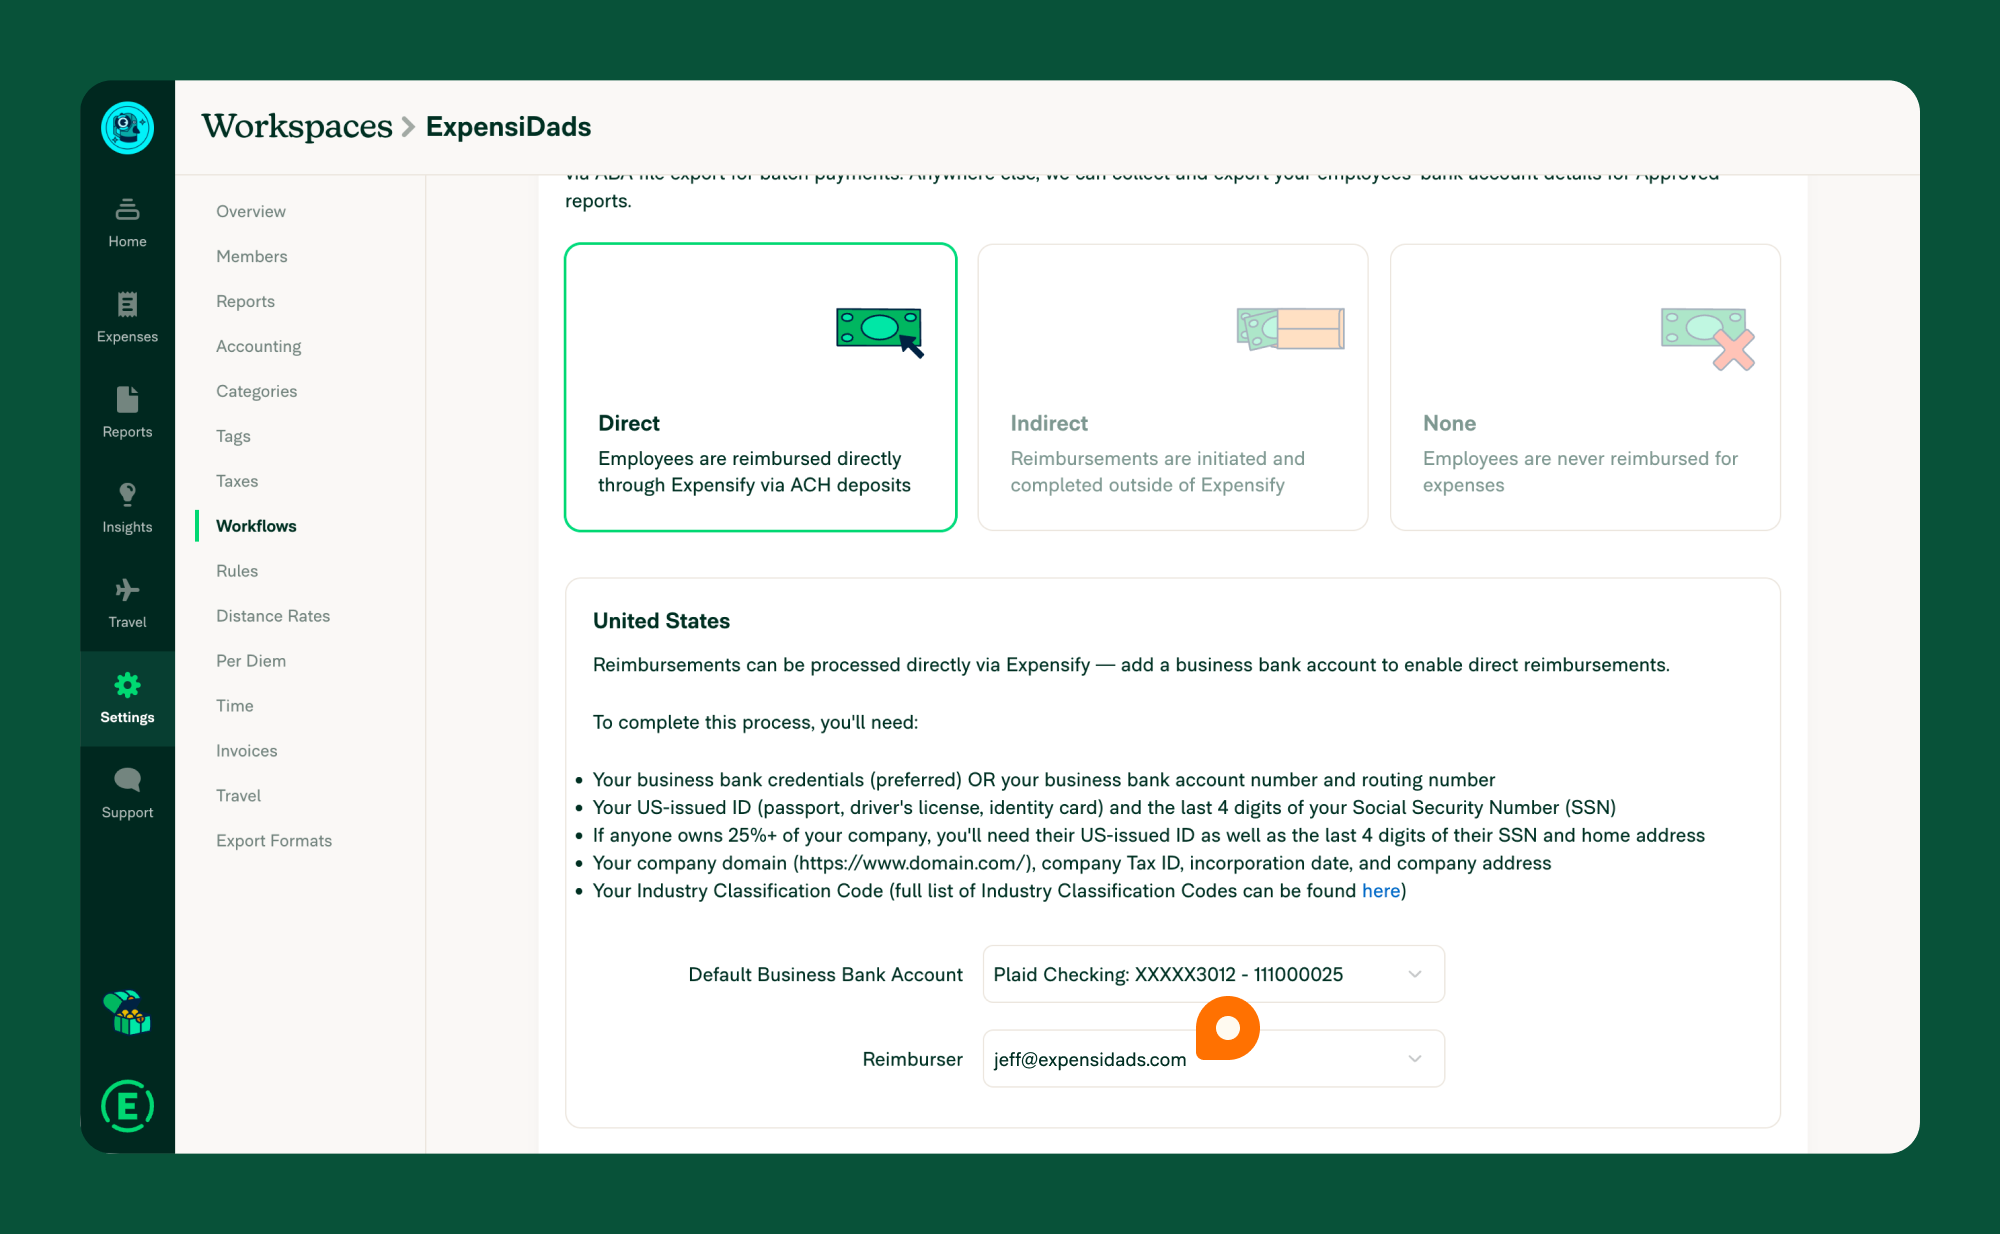
How to change the default reimburser on a workspace
If you’re the new Workspace Admin, make sure reimbursements continue without interruption.
- Go to Settings > Workspaces > [Workspace Name] > Workflows > Payments.
- Confirm that the correct bank account is selected as the reimbursement account.
- If Direct reimbursement is used and the former admin is listed as the Reimburser, assign a new Workspace Admin.
How to reconnect accounting integrations and update the Technical Contact
As the new Workspace Admin, check that all integrations are reconnected under your integration system login.
- Go to Settings > Workspaces > [Workspace Name] > Accounting.
- Reconnect any integrations that were tied to the former admin’s login.
- Update the Technical Contact to yourself or another team member.
How to remove or downgrade the previous Workspace or Domain Admin
If the previous admin is staying with the company, you can simply change their role.
If they’re leaving entirely, remove them completely.
- If they’re staying with the company, a Workspace Admin can:
- Change their role to Employee.
- If they’re leaving, a Domain Admin can:
- Remove them from the workspace.
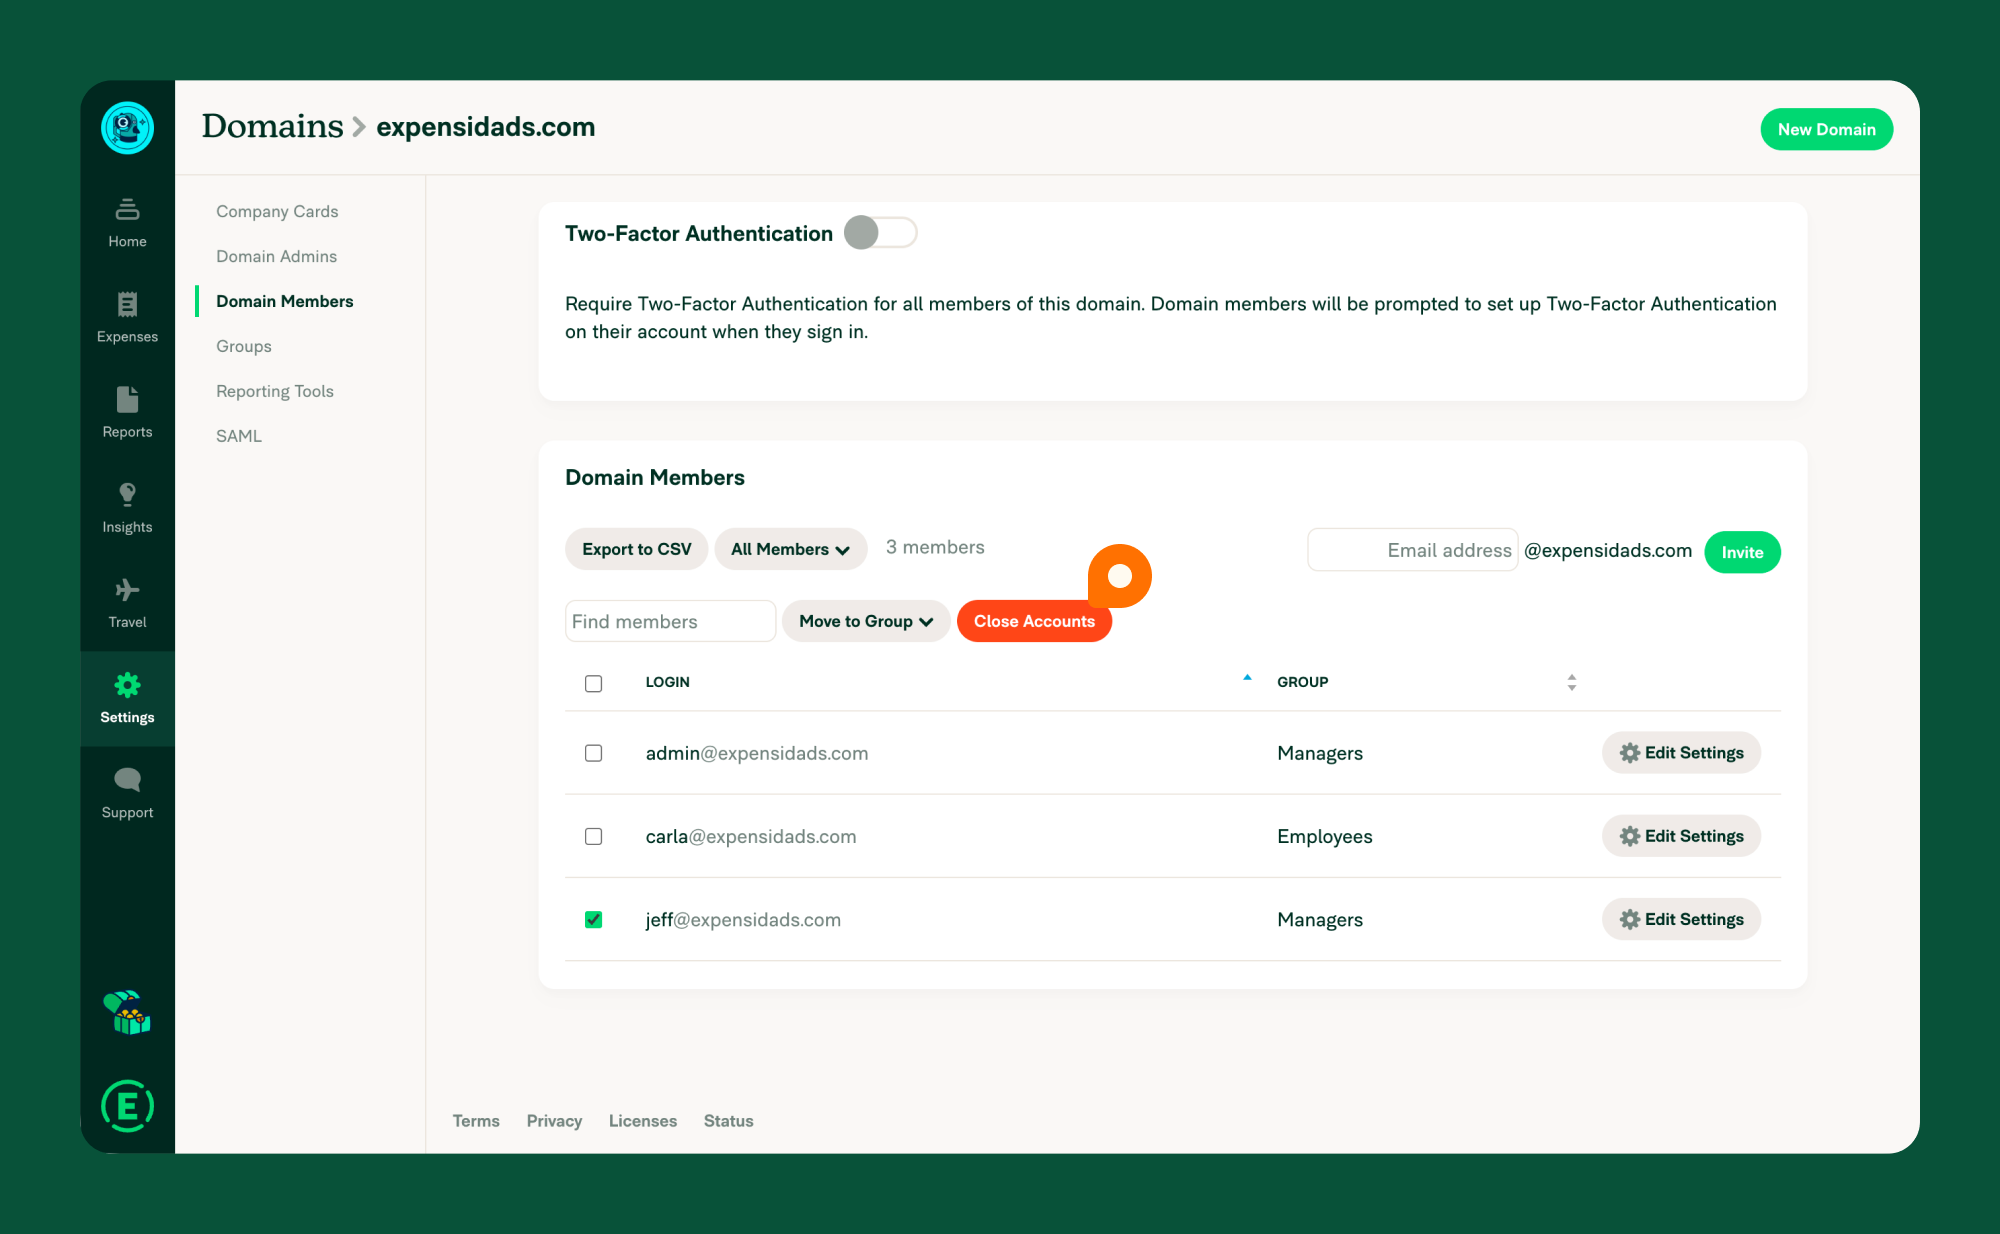
- Fully close their account by removing them from the domain:
- Go to Settings > Domains > [Domain Name] > Domain Members.
- Check the box next to their name.
- Click Close Accounts, then Confirm.
By completing this checklist, you’ll ensure uninterrupted billing, secure financial access, and a smooth transition of admin duties.
FAQ
Do I need to complete this checklist if I only want to manage billing?
No. If you’re only taking over billing and payment responsibilities, follow these steps instead. The full checklist is only needed if an admin is leaving or changing roles.
Who can verify a shared business bank account?
Only the person who sees the test transactions in their external bank account can complete verification. Once the account is shared, the new admin must wait for the transactions and verify them under Settings > Account > Wallet.
Can I remove the previous admin before verifying the bank account?
No. Keep the previous admin’s access until the new admin has verified the shared bank account and updated billing and reimbursement settings.
What happens if the admin leaves before this checklist is completed?
If the departing admin is removed too early, you may lose access to:
- Workspace billing settings
- Expensify Card settlement settings
- Shared bank accounts
- Accounting integrations
To recover access, another Domain Admin must step in or contact Concierge for help. We recommend completing this checklist before offboarding the admin.
What’s the difference between a Workspace Admin and a Domain Admin?
Yes. A verified business bank account can be shared with multiple Workspace Admins. This ensures more than one person can reimburse, pay bills, or act as reimburser.
What’s the Difference Between a Workspace Admin and a Domain Admin?
- Workspace Admins manage billing, reimbursements, integrations, and member roles for a single workspace.
- Domain Admins manage company-wide permissions, SAML, and card feeds (including Expensify Cards).
If you’re unsure which role applies to you, check your permissions under Settings > Workspaces or Settings > Domains.