Connect To Sage Intacct
Expensify’s integration with Sage Intacct allows you to connect using either Role-based permissions or User-based permissions.
Once connected to Intacct, you can automate report exports, customize your coding preferences, and utilize Sage Intacct’s advanced features. When you’ve configured these settings in Expensify correctly, you can use the integration’s settings to automate many tasks, streamlining your workflow for increased efficiency.
Note: The Sage Intacct integration is only available on the Control plan.
Connect to Sage Intacct
We support setting up Sage Intacct with both User-based permissions and Role-based permissions for Expense Reports and Vendor Bills.
- User-based Permissions - Expense Reports
- User-based Permissions - Vendor Bills
- Role-based Permissions - Expense Reports
- Role-based Permissions - Vendor Bills
User-based Permissions - Expense Reports
Please follow these steps if exporting as Expense Reports with user-based permissions.
Checklist of items to complete:
- Create a web services user and set up permissions.
- Enable the Time & Expenses module (Required if exporting as Expense Reports).
- Set up Employees in Sage Intacct (Required if exporting as Expense Reports).
- Set up Expense Types in Sage Intacct (Required if exporting as Expense Reports).
- Enable Customization Services (only applicable if you don’t already use Platform Services).
- Create a test workspace and download the Expensify Package.
- Upload the Package in Sage Intacct.
- Add web services authorization.
- Enter credentials and connect Expensify and Sage Intacct.
- Configure integration sync options.
- Export a test report.
- Connect Sage Intacct to the production workspace.
Step 1: Create a web services user with user-based permissions
Note: If the steps in this section look different in your Sage Intacct instance, you likely use role-based permissions. If that’s the case, see the steps below on creating a web services user for role-based permissions. To connect to Sage Intacct, you’ll need to create a special web services user. This user is essential for tracking actions in Sage Intacct, such as exporting expense reports and credit card charges from Expensify. It also helps ensure smooth operations when new members join or leave your accounting team. The good news is that setting up this web services user won’t cost you anything. Just follow these steps: Go to Company > Web Services Users > New Setup the user using these configurations:
- User ID: “xmlgateway_expensify”
- Last Name and First Name: “Expensify”
- Email Address: Your shared accounting team email
- User Type: “Business”
- Admin Privileges: “Full”
- Status: “Active”
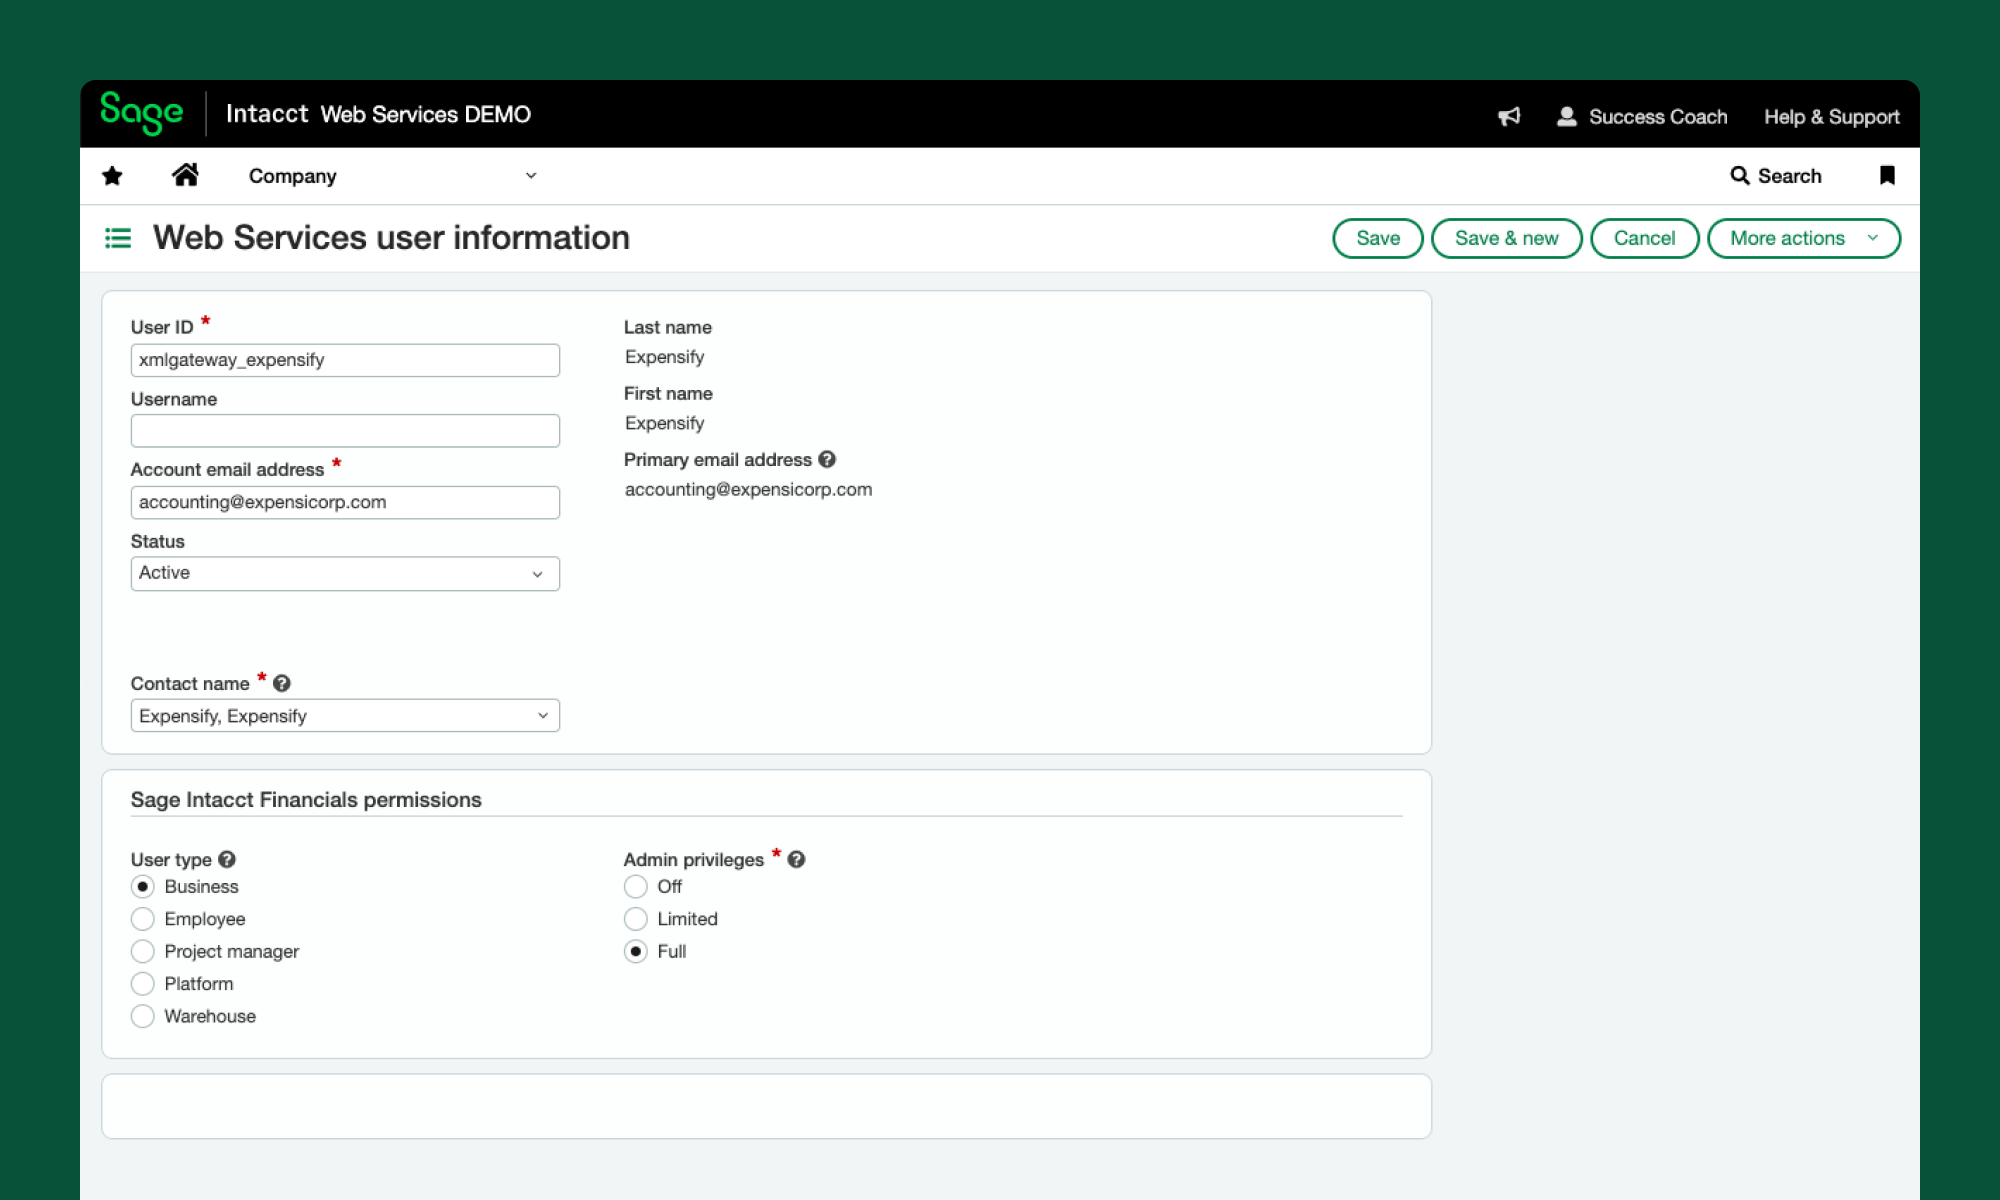
Once you’ve created the user, you’ll need to set the correct permissions. To set those, go to the subscription link for this user in the user list, click on the checkbox next to the Application/Module and then click on the Permissions link to modify those.
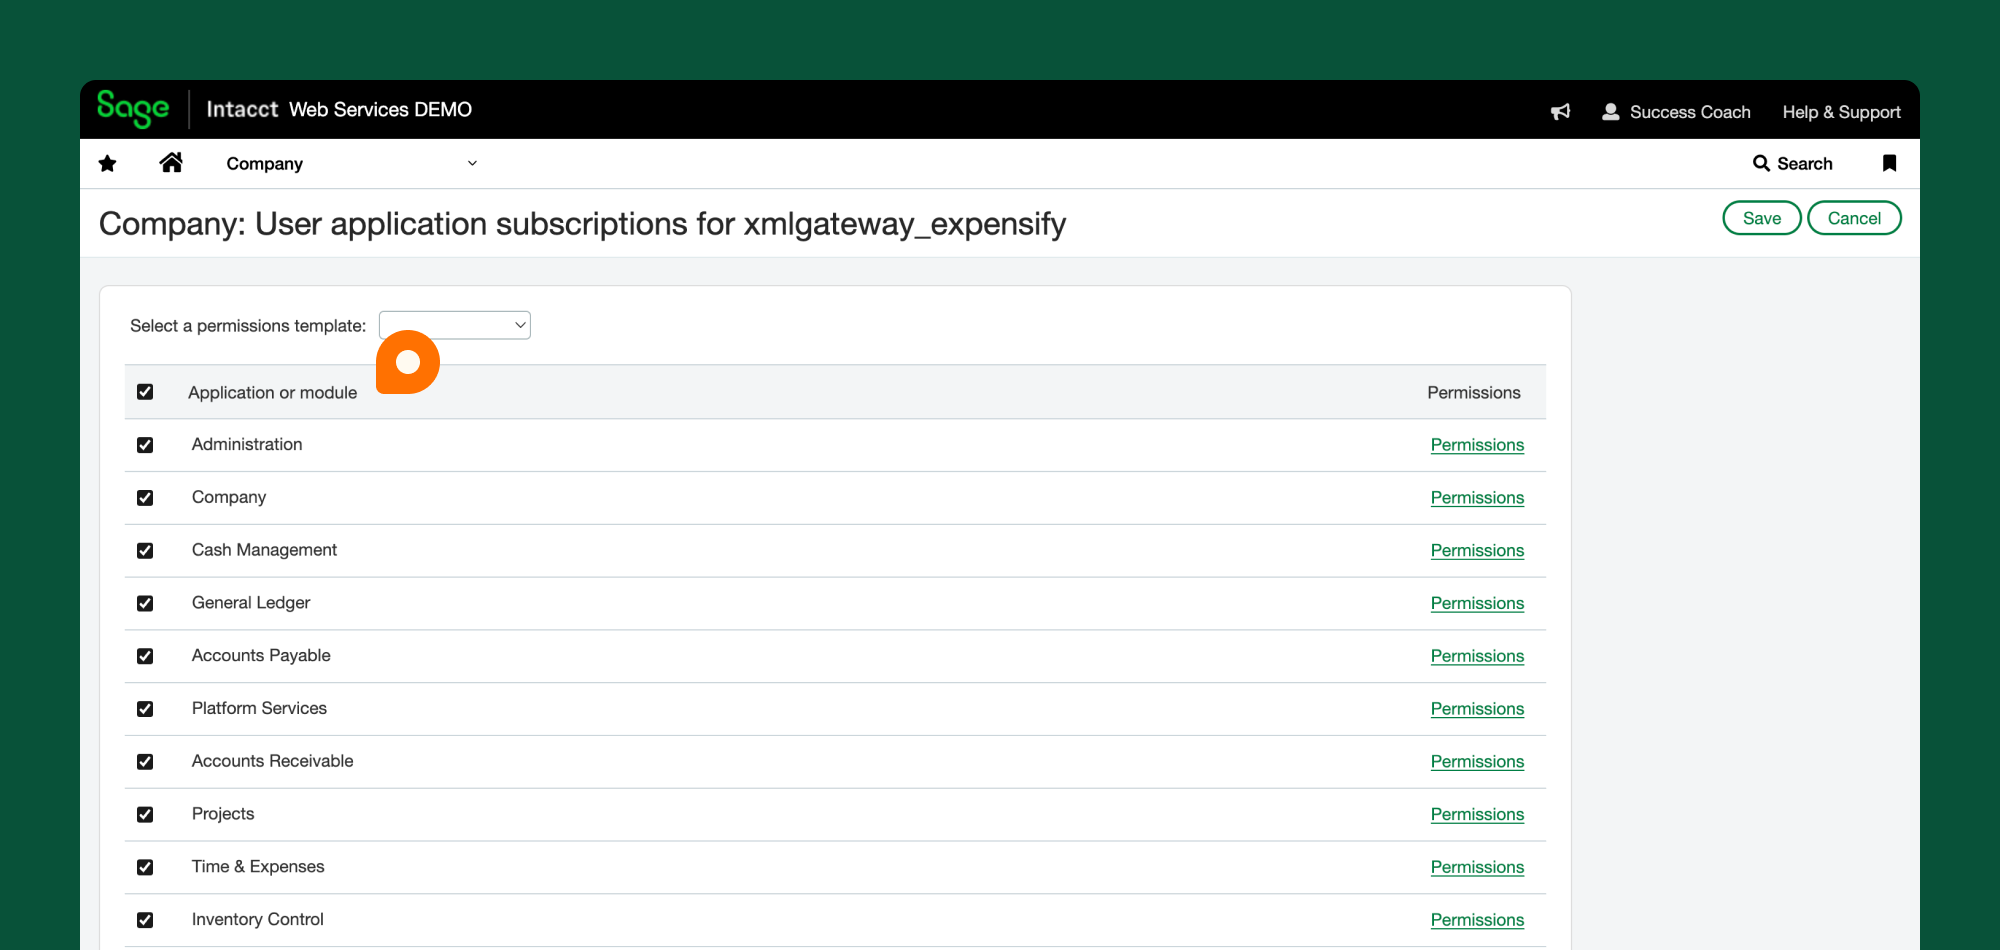
These are the permissions required for a user to export reimbursable expenses as Expense Reports:
- Administration (All)
- Company (Read-only)
- Cash Management (All)
- General Ledger (All)
- Time & Expense (All)
- Projects (Read-only) (only needed if using Projects and Customers)
- Accounts Payable (All) (only needed for exporting non-reimbursable expenses as vendor bills)
Note: You can set permissions for each Application/Module by selecting the radio button next to the desired Permission and clicking Save.
Step 2: Enable the Time & Expenses Module (Only required if exporting reimbursable expenses as Expense Reports)
The Time & Expenses (T&E) module is often included in your Sage Intacct instance, but if it wasn’t part of your initial Sage Intacct setup, you may need to enable it. Enabling the T&E module is a paid subscription through Sage Intacct. For information on the costs of enabling this module, please contact your Sage Intacct account manager. It’s necessary for our integration and only takes a few minutes to configure.
- In Sage Intacct, go to the Company menu > Subscriptions > Time & Expenses and toggle the switch to subscribe.
- After enabling T&E, configure it as follows:
- Ensure that Expense types is checked:
- Under Auto-numbering sequences set the following:
- Expense Report: EXP
- Employee: EMP
- Duplicate Numbers: Select “Do not allow creation”
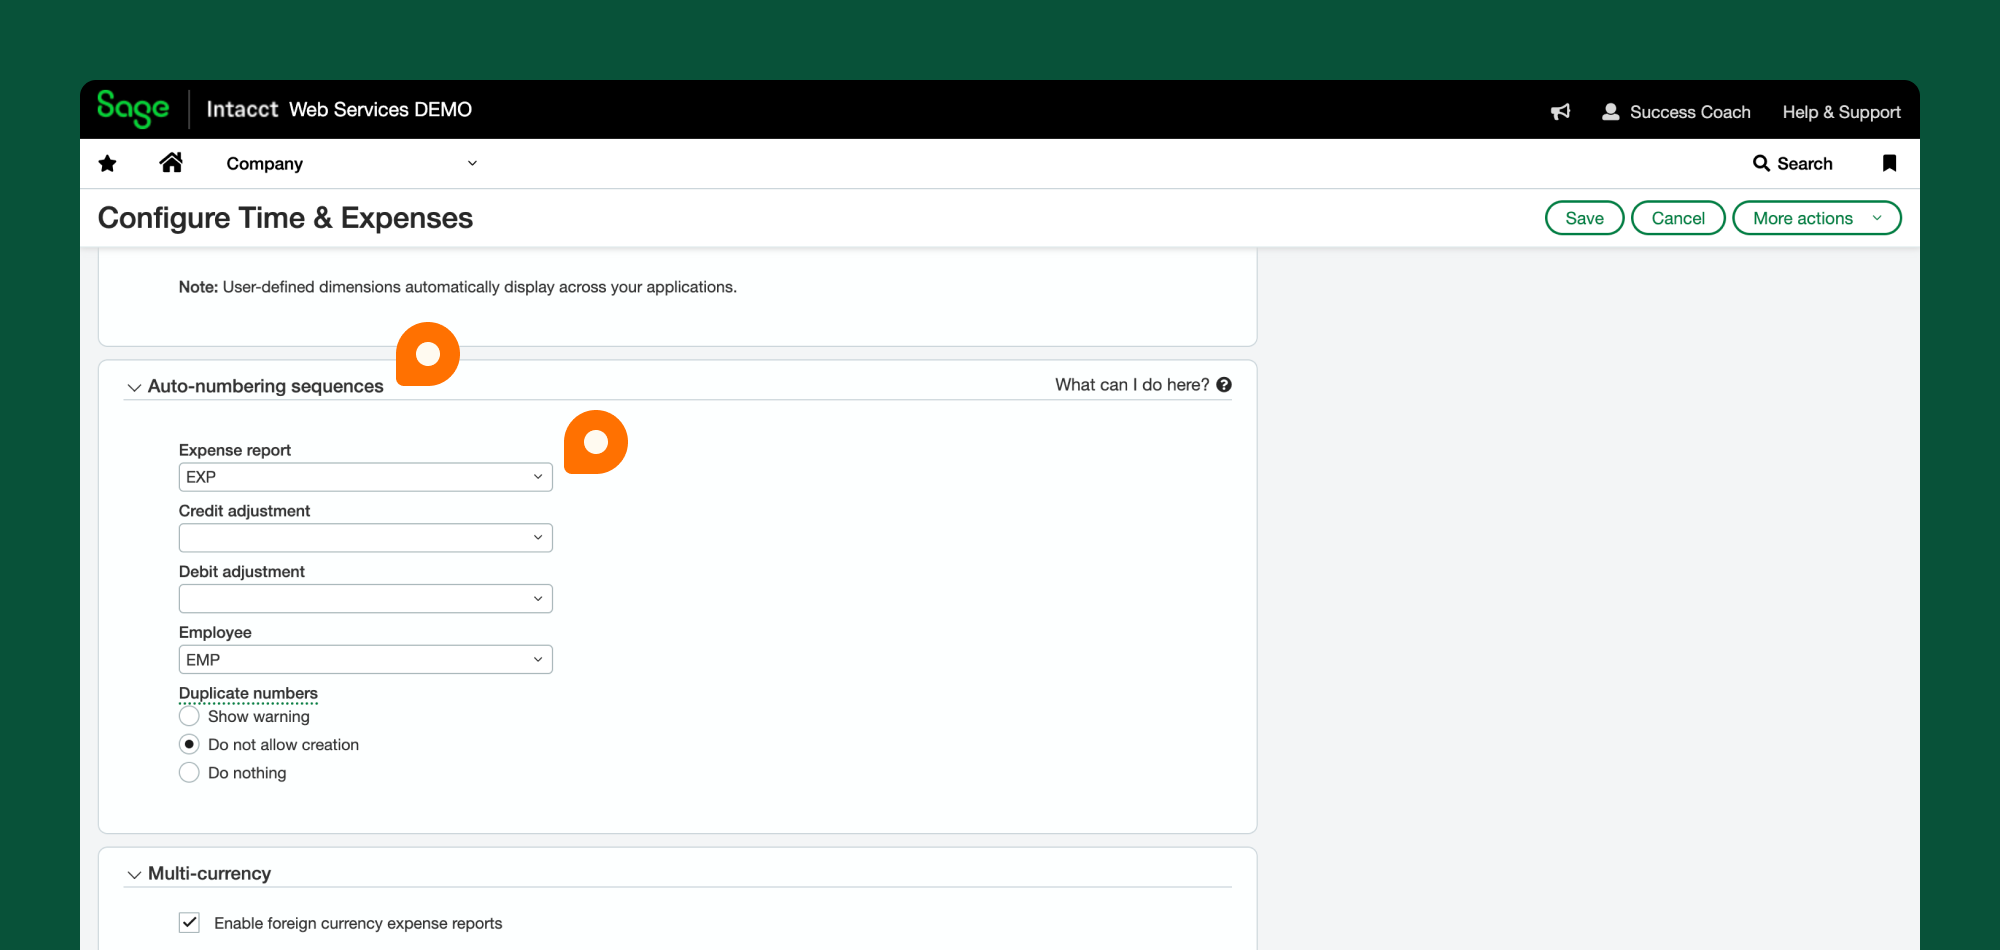
- To create the EXP sequence, click on the down arrow on the expense report line and select **Add:
- Sequence ID: EXP
- Print Title: EXPENSE REPORT
- Starting Number: 1
- Next Number: 2
- Select Advanced Settings and configure the following:
- Fixed Number Length: 4
- Fixed Prefix: EXP
- Click Save
- Under Expense Report approval settings, ensure that Enable expense report approval is unchecked
- Click Save to confirm your configurations.
Step 3: Set up Employees in Sage Intacct (Only required if exporting reimbursable expenses as Expense Reports)
To set up Employees in Sage Intacct, follow these steps:
- Navigate to Time & Expenses and click the plus button next to Employees.
- If you don’t see the Time & Expense option in the top ribbon, you may need to adjust your settings. Go to Company > Roles > Time & Expenses and enable all permissions.
- To create an employee, you’ll need to provide the following information:
- Employee ID
- Primary contact name
- Email address
- In the Primary contact name field, click the dropdown arrow.
- Select the employee if they’ve already been created.
- Otherwise, click + Add to create a new employee.
- Fill in their Primary Email Address along with any other required information.
Step 4: Set up Expense Types in Sage Intacct (Only required if exporting reimbursable expenses as Expense Reports)
Expense Types provide a user-friendly way to display the names of your expense accounts to your employees. They are essential for our integration. To set up Expense Types, follow these steps:
- Setup Your Chart of Accounts: Before configuring Expense Types, ensure your Chart of Accounts is set up. You can set up accounts in bulk by going to Company > Open Setup > Company Setup Checklist > click Import.
- Set up Expense Types:
- Go to Time & Expense.
- Open Setup and click the plus button next to Expense Types.
- For each Expense Type, provide the following information:
- Expense Type
- Description
- Account Number (from your General Ledger) This step is necessary if you are exporting reimbursable expenses as Expense Reports.
Step 5: Enable Customization Services
To enable Customization Services go to Company > Subscriptions > Customization Services.
- If you already have Platform Services enabled, you can skip this step.
Step 6: Create a Test Workspace in Expensify and Download the Expensify Package
Creating a test workspace in Expensify allows you to have a sandbox environment for testing before implementing the integration live. If you are already using Expensify, creating a test workspace ensures that your existing group workspace rules and approval workflows remain intact. Here’s how to set it up:
-
Go to Settings > Workspaces > New Workspace.
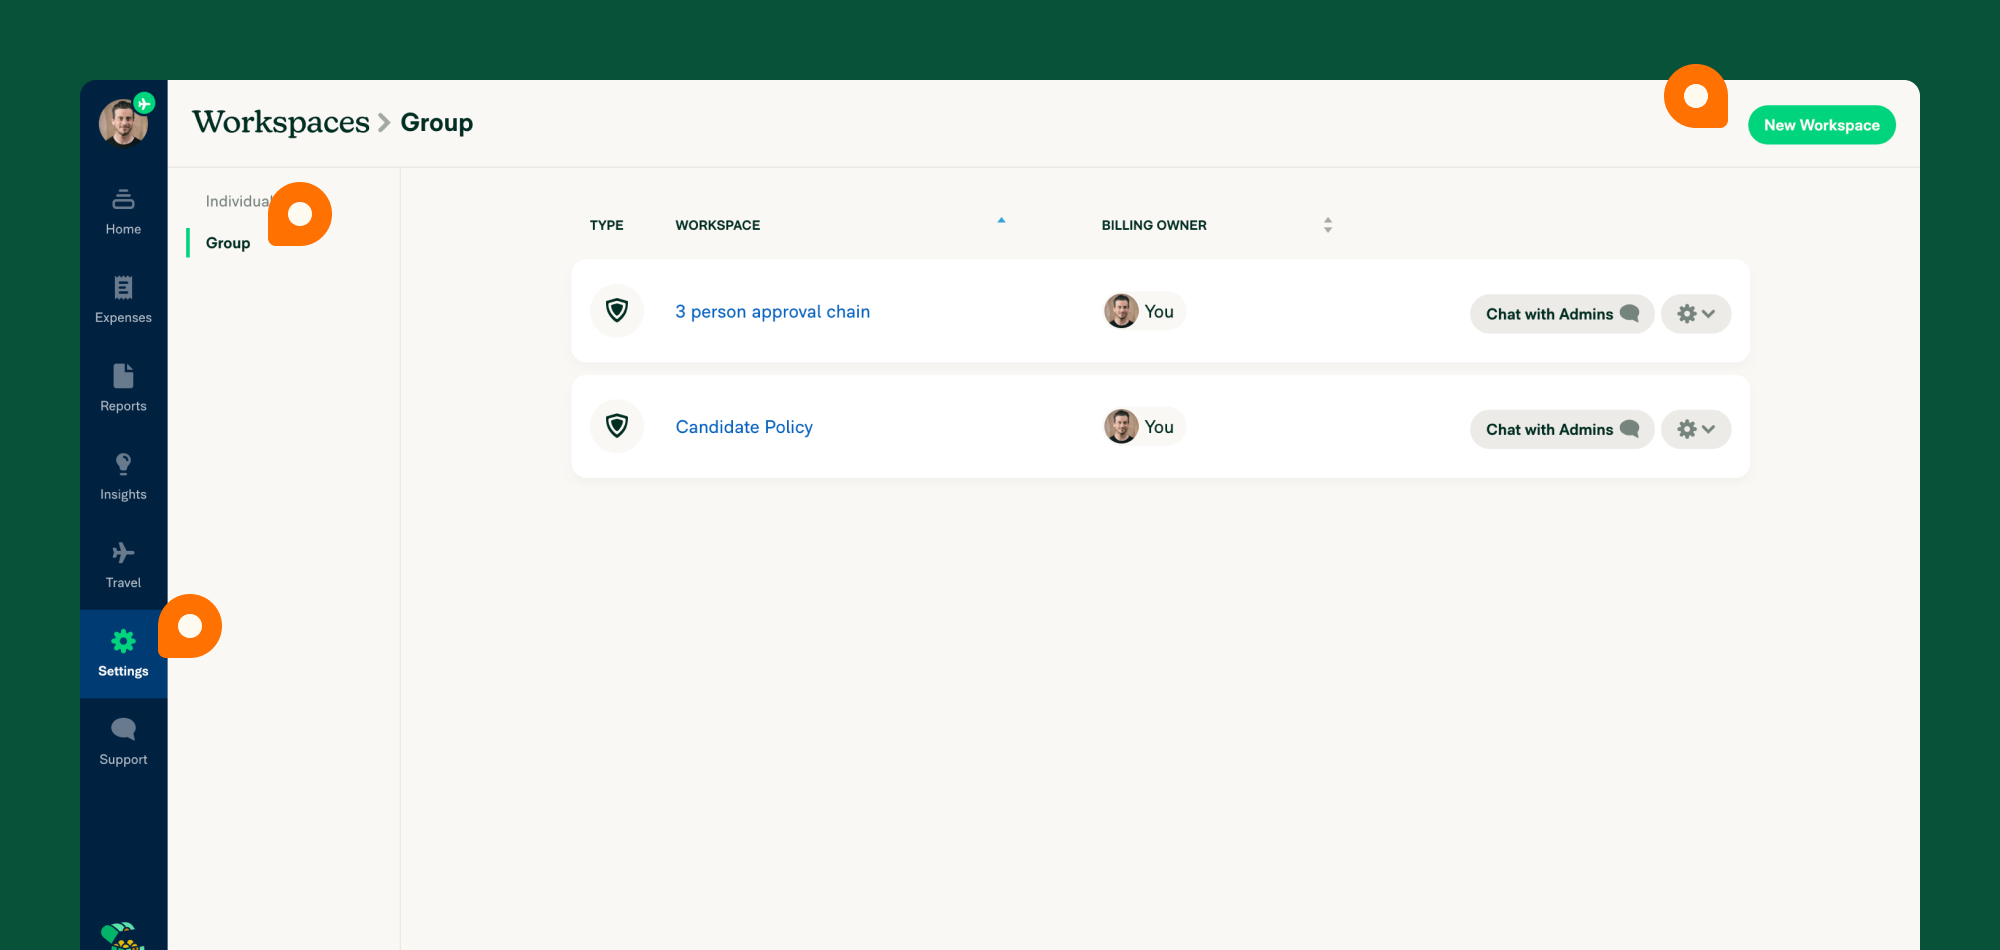
- Name the workspace something like “Sage Intacct Test Workspace.”
-
Go to Accounting > Sage Intacct > Connect to Sage Intacct.
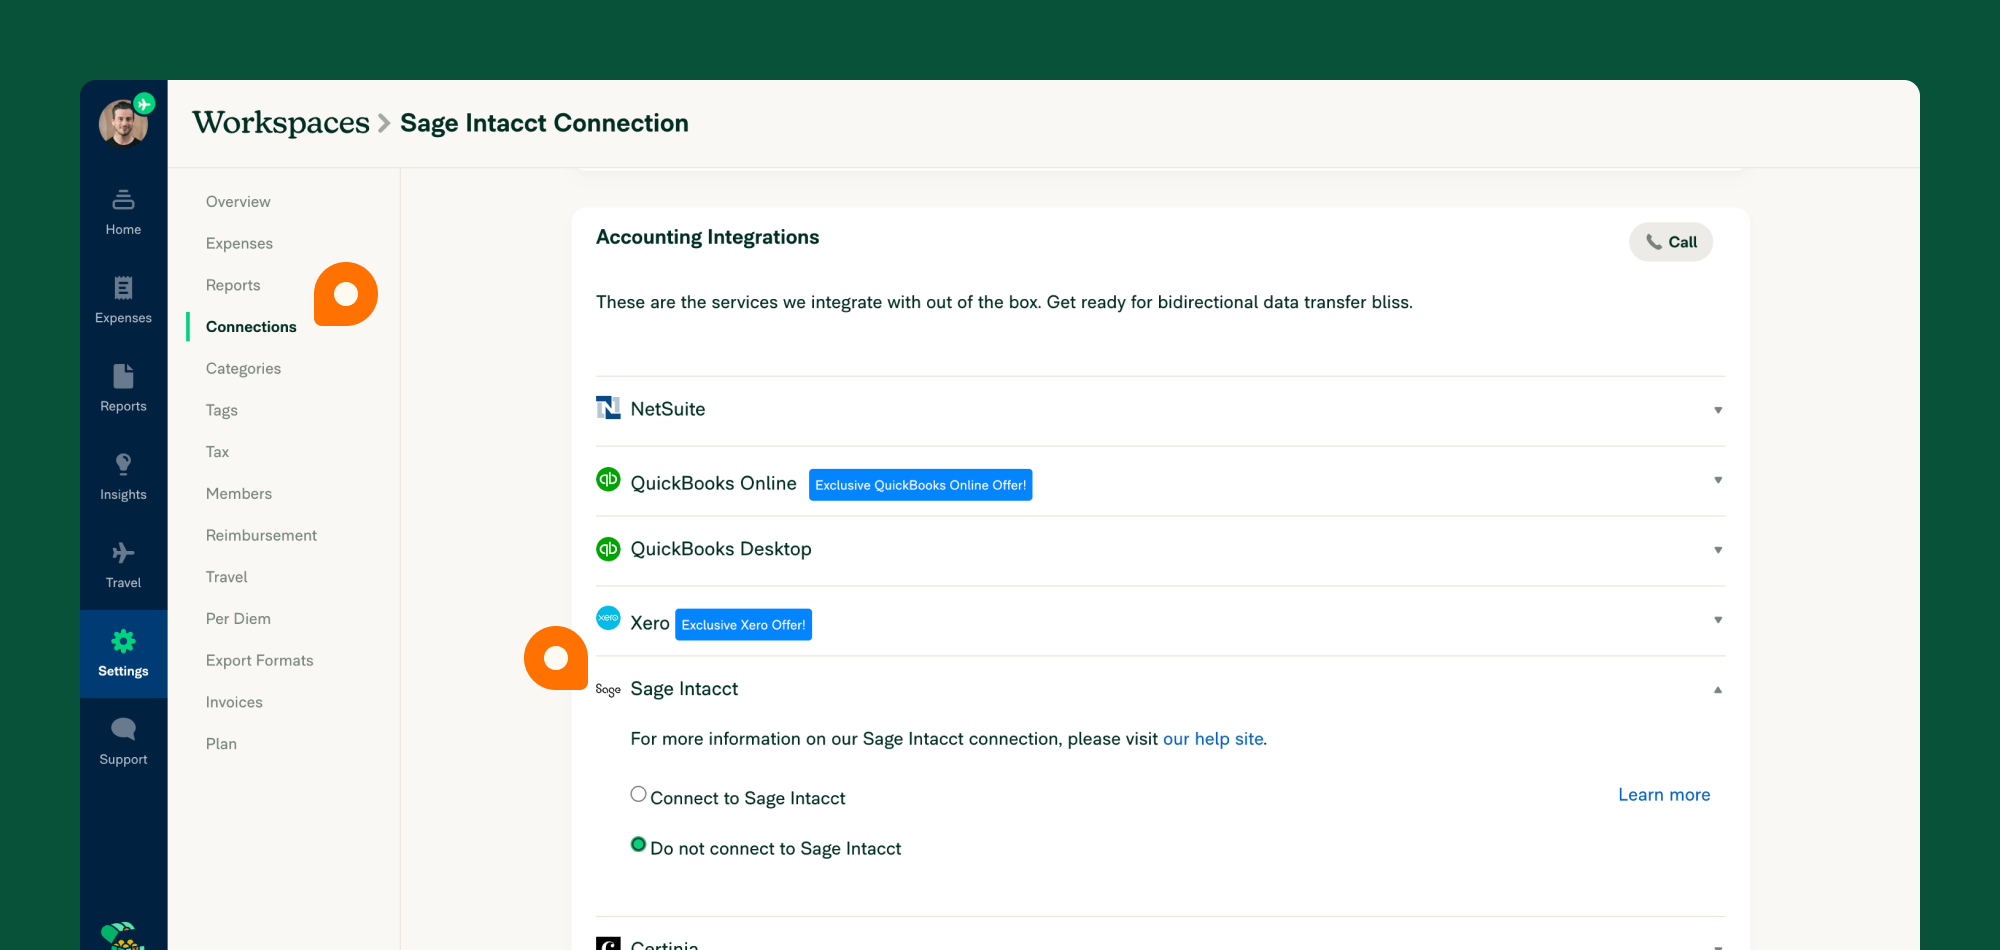
- Select Download Package (You only need to download the file; we’ll upload it from your Downloads folder later).
Step 7: Upload Package in Sage Intacct
If you use Customization Services:
- Go to Customization Services > Custom Packages > New Package.
- Click on Choose File and select the Package file from your downloads folder.
- Click Import.
If you use Platform Services:
- Go to Platform Services > Custom Packages > New Package.
- Click on Choose File and select the Package file from your downloads folder.
- Click Import.
Step 8: Add Web Services Authorization
- Go to Company > Company Info > Security in Intacct and click Edit.
- Scroll down to Web Services Authorizations and add “expensify” (all lowercase) as a Sender ID.
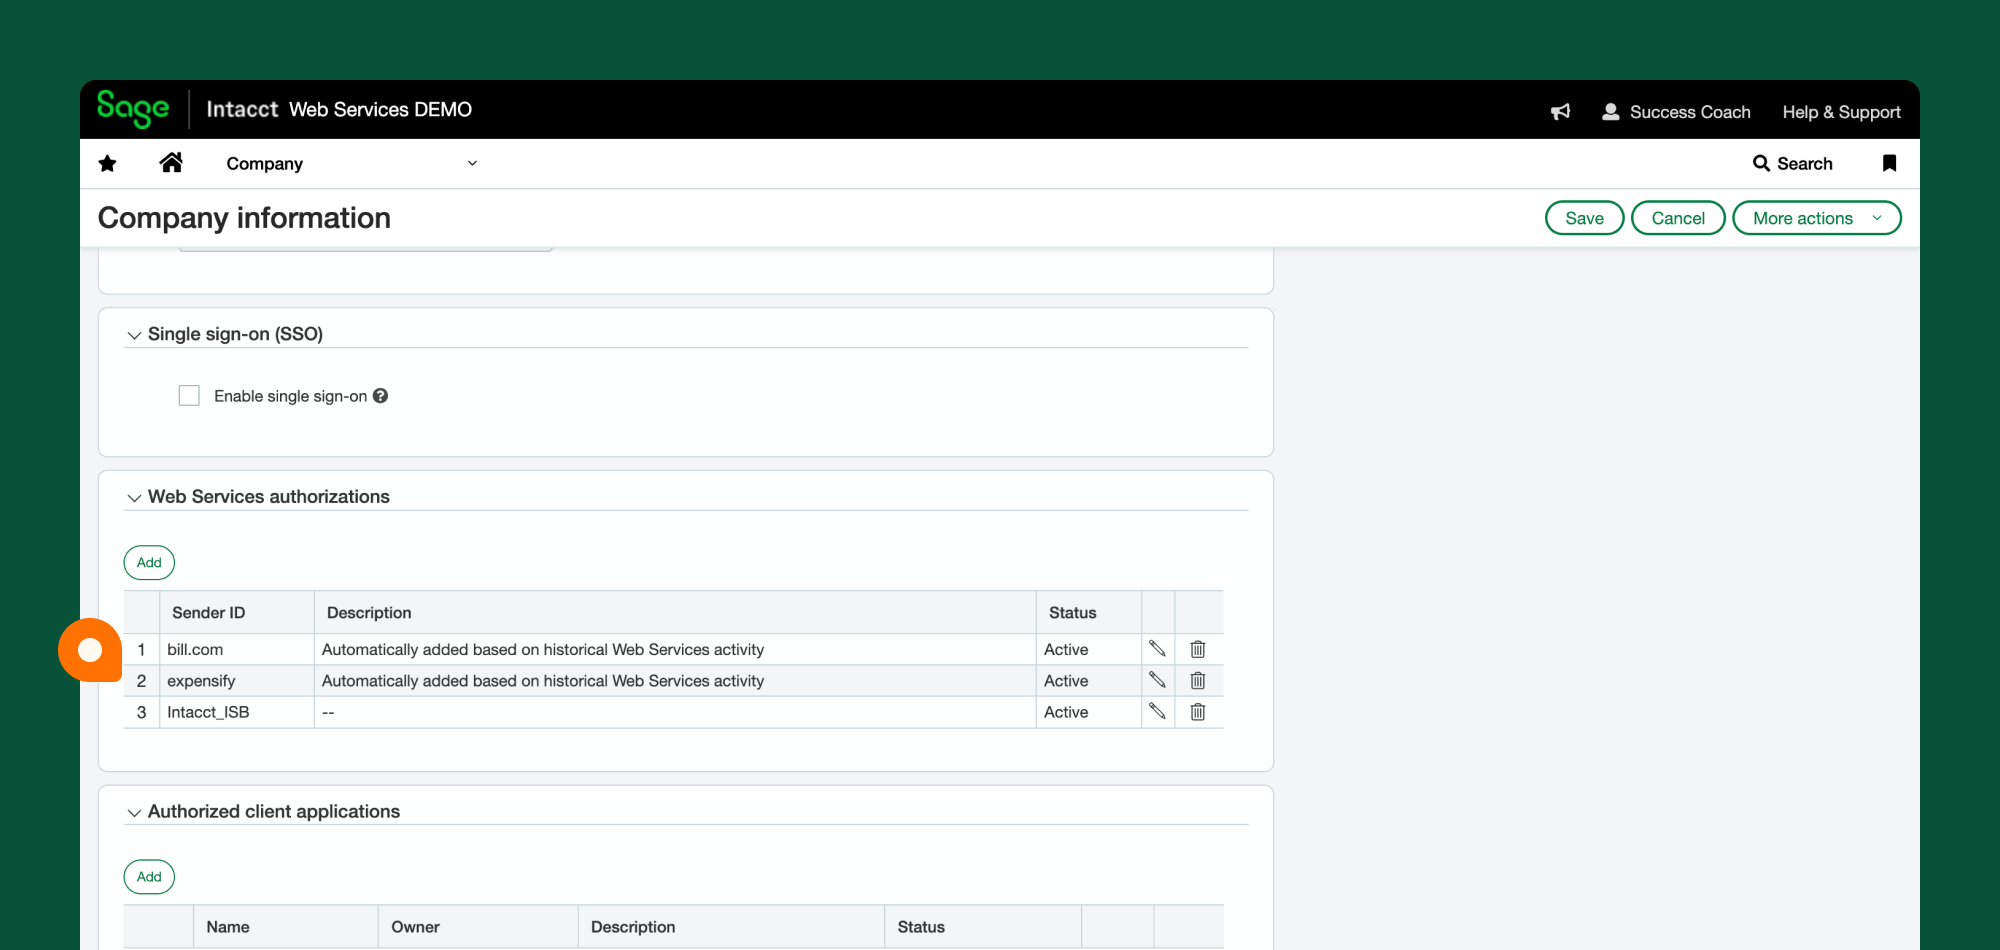
Step 9: Enter Credentials and Connect Expensify and Sage Intacct
- Go back to Settings > Workspaces > [Workspace Name] > Accounting > Configure.
- Click Connect to Sage Intacct and enter the credentials you’ve set for your web services user.
- Click Send once you’re done.
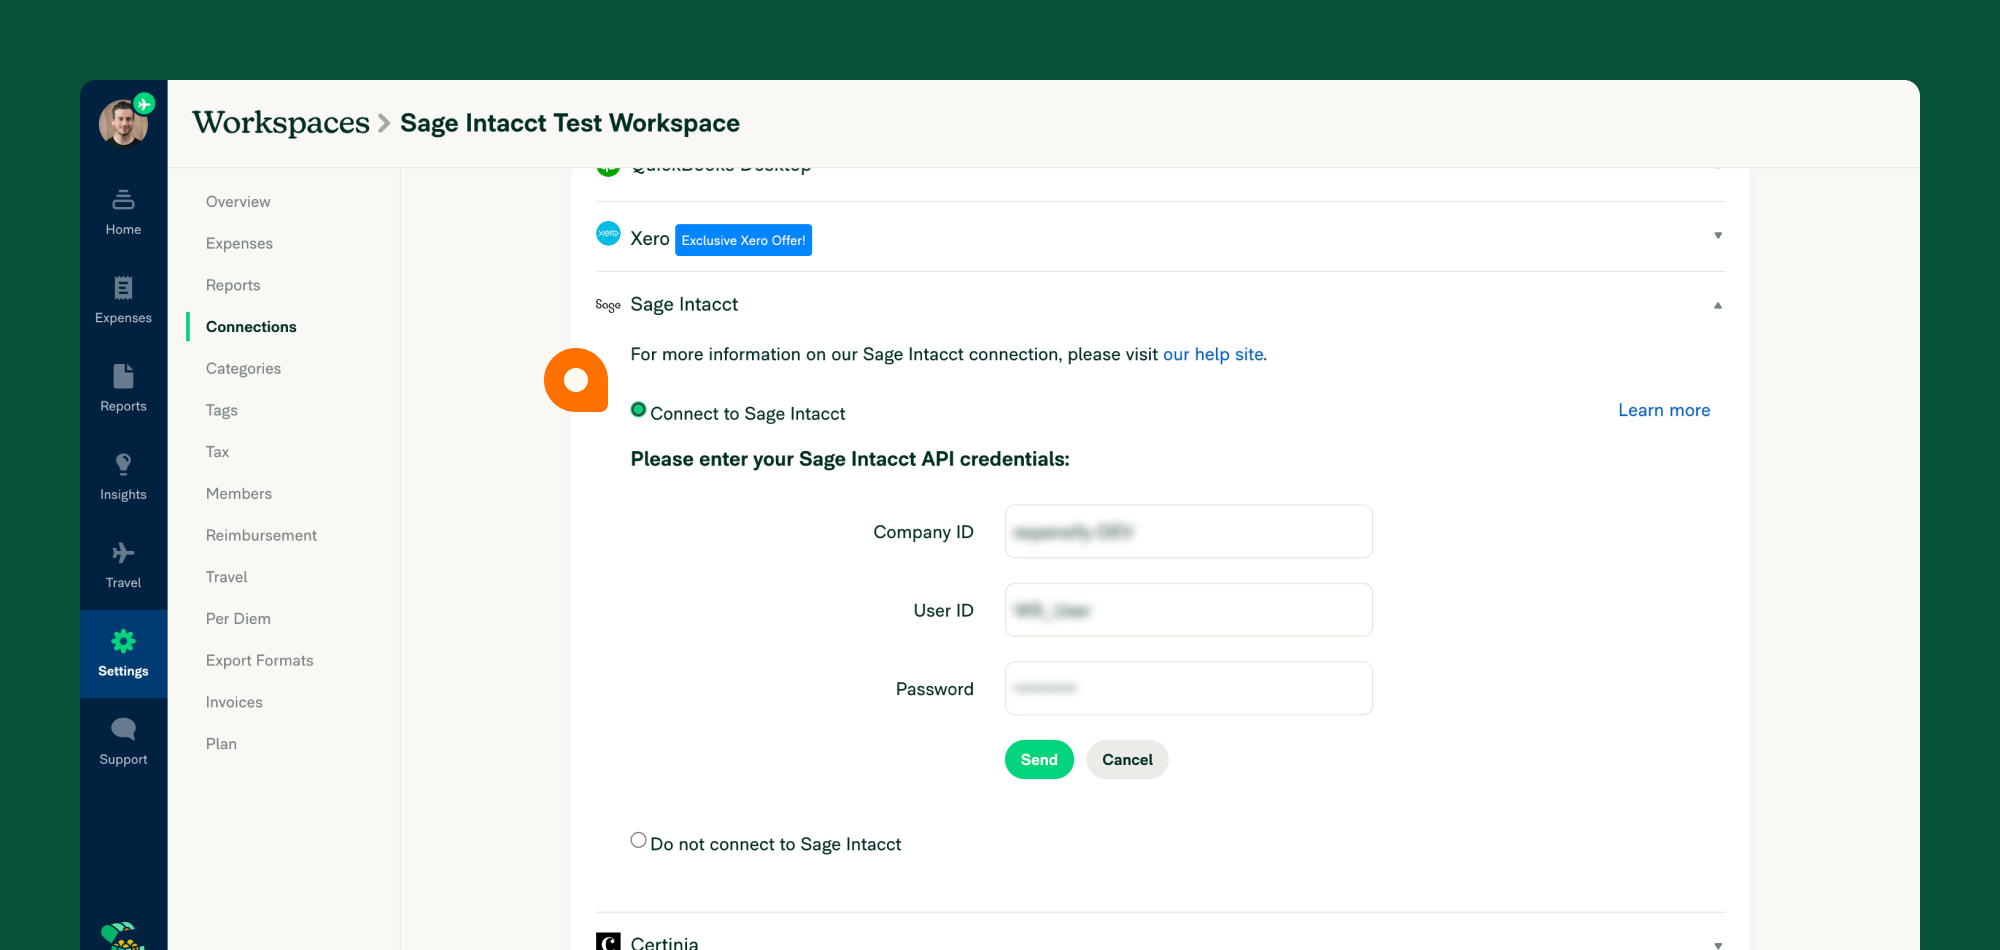
Next, you’ll configure the Export, Coding, and Advanced tabs of the connection configuration in Expensify.
User-based Permissions - Vendor Bills
In this setup guide, we’ll take you through the steps to establish your connection for Vendor Bills with user-based permissions. Please follow this checklist of items to complete:
- Create a web services user and set up permissions.
- Enable Customization Services (only required if you don’t already use Platform Services).
- Create a test workspace in Expensify and download the Expensify Package
- Upload the Package in Sage Intacct.
- Add web services authorization.
- Enter credentials and connect Expensify and Sage Intacct.
- Configure integration sync options.
Step 1: Create a web services user with user-based permissions
Note: If the steps in this section look different in your Sage Intacct instance, you likely use role-based permissions. If that’s the case, see the steps below on creating a web services user for role-based permissions. To connect to Sage Intacct, it’s necessary to set up a web services user. This user simplifies tracking activity within Sage Intacct, such as exporting expense reports and credit card charges from Expensify. It also ensures a seamless transition when someone joins or leaves your accounting department. Setting up the web services user is free of charge. Please follow these steps:
- Go to Company > Web Services Users > New.
- Configure the user as shown in the screenshot below, making sure to follow these guidelines:
- User ID: “xmlgateway_expensify”
- Last Name and First Name: “Expensify”
- Email Address: Your shared accounting team email
- User Type: “Business”
- Admin Privileges: “Full”
- Status: “Active”
Once you’ve created the user, you’ll need to set the correct permissions. To do this, follow these steps:
- Go to the subscription link for this user in the user list.
- Click on the checkbox next to the Application/Module you want to modify permissions for.
- Click on the Permissions link to make modifications.
These are the permissions the user needs to have if exporting reimbursable expenses as Vendor Bills:
- Administration (All)
- Company (Read-only)
- Cash Management (All)
- General Ledger (All)
- Accounts Payable (All)
- Projects (Read-only) (required if you’re going to be using Projects and Customers)
Note: Selecting the radio button next to the Permission you want and clicking Save will set the permissions for that particular Application/Module.
Step 2: Enable Customization Services (only applicable if you don’t already use Platform Services)
To enable Customization Services go to Company > Subscriptions > Customization Services.
- If you already have Platform Services enabled, you can skip this step.
Step 3: Create a Test Workspace in Expensify and Download Expensify Package
Creating a test workspace in Expensify allows you to establish a sandbox environment for testing before implementing the integration in a live environment. If you’re already using Expensify, creating a test workspace ensures that your existing company workspace rules and approval workflows remain intact. Here’s how to set it up:
- Go to expensify.com > Settings > Workspaces > Groups > New Workspace.
- Name the workspace something like “Sage Intacct Test Workspace.”
- Go to Accounting > Sage Intacct > Connect to Sage Intacct.
- Select “I’ve completed these” if you’ve downloaded the Expensify Package and completed the previous steps in Sage Intacct.
- Select Download Package (You only need to download the file; we’ll upload it from your Downloads folder later).
Step 4: Upload the Package in Sage Intacct
If you use Customization Services:
- Go to Customization Services > Custom Packages > New Package.
- Click on Choose File and select the Package file from your downloads folder.
- Click Import.
If you use Platform Services:
- Go to Platform Services > Custom Packages > New Package.
- Click on Choose File and select the Package file from your downloads folder.
- Click Import.
Step 5: Add Web Services Authorization
- Go to Company > Company Info > Security in Intacct and click Edit.
- Scroll down to Web Services Authorizations and add “expensify” (all lowercase) as a Sender ID.
Step 6: Enter Credentials and Connect Expensify with Sage Intacct
- Go back to Settings > Workspaces > Groups > [Workspace Name] > Accounting > Configure.
- Click on Connect to Sage Intacct.
- Enter the credentials that you’ve previously set for your web services user.
- Click Send once you’ve finished entering the credentials.
Next, you’ll configure the Export, Coding, and Advanced tabs of the connection configuration in Expensify.
Role-based Permissions - Expense Reports
For this setup guide, we’ll walk you through how to get your connection up and running as Expense Reports with role-based permissions.
Checklist of items to complete:
- Create web services user and set up permissions
- Enable Time & Expenses module
- Set up Employees in Sage Intacct
- Set up Expense Types in Sage Intacct
- Enable Customization Services (only applicable if you don’t already use Platform Services)
- Create a test workspace and download the Expensify Package
- Upload the Package in Sage Intacct
- Add web services authorization
- Enter credentials and connect Expensify and Sage Intacct
- Configure integration sync options
Step 1: Create a web services user with role-based permissions
In Sage Intacct, click Company, then click on the + button next to Roles.
Name the role, then click Save.
Go to Roles > Subscriptions for the “Expensify” role you just created.
Set the permissions for this role by clicking the checkbox and then clicking on the Permissions hyperlink.
These are the permissions required for a user to export reimbursable expenses as Expense Reports:
- Administration (All)
- Company (Read-only)
- Cash Management (All)
- General Ledger (All)
- Time & Expense (All)
- Projects (Read-only) (only needed if using Projects and Customers)
- Accounts Payable (All) (only needed for exporting non-reimbursable expenses as vendor bills)
Now, you’ll need to create a web services user and assign this role to that user.
- Company > Web Services Users > New
- Set up the user like the screenshot below, making sure to do the following:
- User ID: “xmlgateway_expensify”
- Last name and First name: “Expensify”
- Email address: your shared accounting team email
- User type: “Business”
- Admin privileges: “Full”
- Status: “Active”
To assign the role, go to Roles Information:
- Click the + button, then find the “Expensify” role and click Save.
Step 2: Enable the Time & Expenses module (Only required if exporting reimbursable expenses as Expense Reports)
The T&E module often comes standard on your Sage Intacct instance, but you may need to enable it if it was not a part of your initial Sage Intacct implementation. Enabling the T&E module is a paid subscription through Sage Intacct. Please reach out to your Sage Intacct account manager with any questions on the costs of enabling this module. It’s required for our integration and takes just a few minutes to configure.
In Sage Intacct, click on the Company menu > Subscriptions > Time & Expenses and click the toggle to subscribe.
Once you’ve enabled T&E, you’ll need to configure it properly:
- Ensure that Expense types is checked.
- Under Auto-numbering sequences, please set the following:
- To create the EXP sequence, click on the down arrow on the expense report line > Add
- Sequence ID: EXP
- Print Title: EXPENSE REPORT
- Starting Number: 1
- Next Number: 2
- Once you’ve done this, select Advanced Settings
- Fixed Number Length: 4
- Fixed Prefix: EXP
- Once you’ve done this, hit Save
- Under Expense Report approval settings, make sure the “Enable expense report approval” is unchecked.
- Click Save!
Step 3: Set up Employees in Sage Intacct (Only required if exporting reimbursable expenses as Expense Reports)
In order to set up Employees, go to Time & Expenses > click the plus button next to Employees. If you don’t see Time & Expense in the top ribbon, you may need to adjust your settings by going to Company > Roles > Time & Expenses > Enable all permissions. To create an employee, you’ll need to insert the following information:
- Employee ID
- Primary contact name
- Email address (click the dropdown arrow in the Primary contact name field) > select the employee if they’ve already been created. Otherwise click + Add > fill in their Primary Email Address along with any other information you require.
Step 4: Set up Expense Types in Sage Intacct (only required if exporting reimbursable expenses as Expense Reports)
Expense Types are a user-friendly way of displaying the names of your expense accounts to your employees. They are required for our integration. To set up Expense Types, you’ll first need to set up your Chart of Accounts (you can set these up in bulk by going to Company > Open Setup > Company Setup Checklist > click Import).
Once you’ve set up your Chart of Accounts, to set Expense Types, go to Time & Expense > Open Setup > click the plus button next to Expense Types. For each Expense Type, you’ll need to include the following information:
- Expense Type
- Description
- Account Number (from your GL)
Step 5: Enable Customization Services
Go to Company > Subscriptions > Customization Services (you will skip this step if you already have Platform Services enabled).
Step 6: Create a test workspace in Expensify and download Expensify Package
The test workspace will be used as a sandbox environment where we can test before going live with the integration. If you’re already using Expensify, creating a test workspace will ensure that your existing group workspace rules, approval workflow, etc, remain intact. In order to set this up:
- Go to expensify.com > Settings > Workspaces > New Workspace
- Name the workspace something like “Sage Intacct Test Workspace”
- Go to Accounting > Sage Intacct > Connect to Sage Intacct
- Select Download Package (All you need to do is download the file. We’ll upload it from your Downloads folder later).
Step 7: Upload Package in Sage Intacct
If you use Customization Services:
- Customization Services > Custom Packages > New Package > Choose File > select the Package file from your downloads folder > Import
If you use Platform Services:
- Platform Services > Custom Packages > New Package > Choose File > select the Package file from your downloads folder > Import
Step 8: Add web services authorization
- Go to Company > Company Info > Security in Intacct and click Edit. Next, scroll down to Web Services authorizations and add “expensify” (this must be all lower case) as a Sender ID.
Step 9: Enter credentials and connect Expensify and Sage Intacct
- Now, go back to Settings > Workspaces > Group > [Workspace Name] > Accounting > Configure > Connect to Sage Intacct and enter the credentials that you’ve set for your web services user. Click Send once you’re done.
Next, follow the links in the related articles section below to complete the configuration for the Export, Coding, and Advanced tabs of the connection settings.
Role-based Permissions - Vendor Bills
Follow the steps below to set up Sage Intacct with role-based permissions and export Vendor Bills:
Checklist of items to complete:
- Create a web services user and configure permissions.
- Enable Customization Services (if not using Platform Services).
- Create a test workspace in Expensify and download the Expensify Package.
- Upload the Package in Sage Intacct.
- Add web services authorization.
- Enter credentials and connect Expensify and Sage Intacct.
- Configure integration sync options.
Step 1: Create a web services user with role-based permissions
In Sage Intacct:
- Navigate to “Company” and click the + button next to “Roles.”
- Name the role and click Save.
- Go to “Roles” > “Subscriptions” for the “Expensify” role you created.
- Set the permissions for this role by clicking the checkbox and then clicking on the Permissions hyperlink
These are the permissions required for a user to export reimbursable expenses as Vendor Bills:
- Administration (All)
- Company (Read-only)
- Cash Management (All)
- General Ledger (All)
- Time & Expense (All)
- Projects (Read-only) (only needed if using Projects and Customers)
-
Accounts Payable (All) (only needed for exporting non-reimbursable expenses as vendor bills)
- Create a web services user:
- Go to Company > Web Services Users > New
- Configure the user as follows:
- User ID: “xmlgateway_expensify”
- Last Name and First Name: “Expensify”
- Email Address: Your shared accounting team email
- User Type: “Business”
- Admin Privileges: “Full”
- Status: “Active”
- To assign the role, go to “Roles Information”, click the + button, find the “Expensify” role, and click Save
Step 2: Enable Customization Services
Only required if you don’t already use Platform Services:
- To enable, go to Company > Subscriptions > Customization Services
Step 3: Create a test workspace in Expensify and download the Expensify Package
Create a test workspace in Expensify:
- Go to Settings > Workspaces and click New Workspace on the Expensify website.
- Name the workspace something like “Sage Intacct Test Workspace.”
- Once created, navigate to Settings > Workspaces > [Group Workspace Name] > Accounting > Accounting Integrations > Connect to Sage Intacct
- Select Create a new Sage Intacct connection/Connect to Sage Intacct
- Select Download Package (We’ll upload it from your Downloads folder later.)
Step 4: Upload Package in Sage Intacct
If you use Customization Services:
- Go to Customization Services > Custom Packages > New Package > Choose File > select the Package file from your downloads folder > Import.
If you use Platform Services:
- Go to Platform Services > Custom Packages > New Package > Choose File > select the Package file from your downloads folder > Import.
Step 5: Add web services authorization
- Go to Company > Company Info > Security in Intacct and click Edit
- Scroll down to Web Services Authorizations and add expensify (all lowercase) as a Sender ID.
Step 6: Enter credentials and connect Expensify and Sage Intacct
Now, go back to Settings > Workspaces > [Workspace Name] > Accounting > Accounting Integrations > Configure > Connect to Sage Intacct and enter the credentials you set for your web services user. When finished, click Send.
Step 7: Configure your connection
Once the initial sync completes, you may receive the error “No Expense Types Found” if you’re not using the Time and Expenses module. Close the error dialogue, and your configuration options will appear. Switch the reimbursable export option to Vendor Bills and click Save before completing your configuration.
Next, refer to the Configure Sage Intacct article to finish setting up the Export, Coding, and Advanced tabs of the connection configuration.


