


Workspace Rules
Workspace Rules
Workspace Rules let Admins enforce expense policies by setting custom requirements for receipts, spending limits, category behavior, auto-approvals, and more. These rules help ensure compliance and streamline the approval process.
If your approval requirements can’t be handled using Workspace Rules alone, create an Agent Rule. Agent Rules are AI-powered rules that let Workspace Admins automate report reviews, routing, approvals, and other workspace actions using natural-language instructions. Learn how to create Agent Rules.
How to enable Workspace Rules
To activate Rules for your workspace:
- In the navigation tabs (on the left on web, and at the bottom on mobile), click Workspaces.
- Click your workspace name.
- Click More Features.
- Under the Manage section, toggle on Rules.
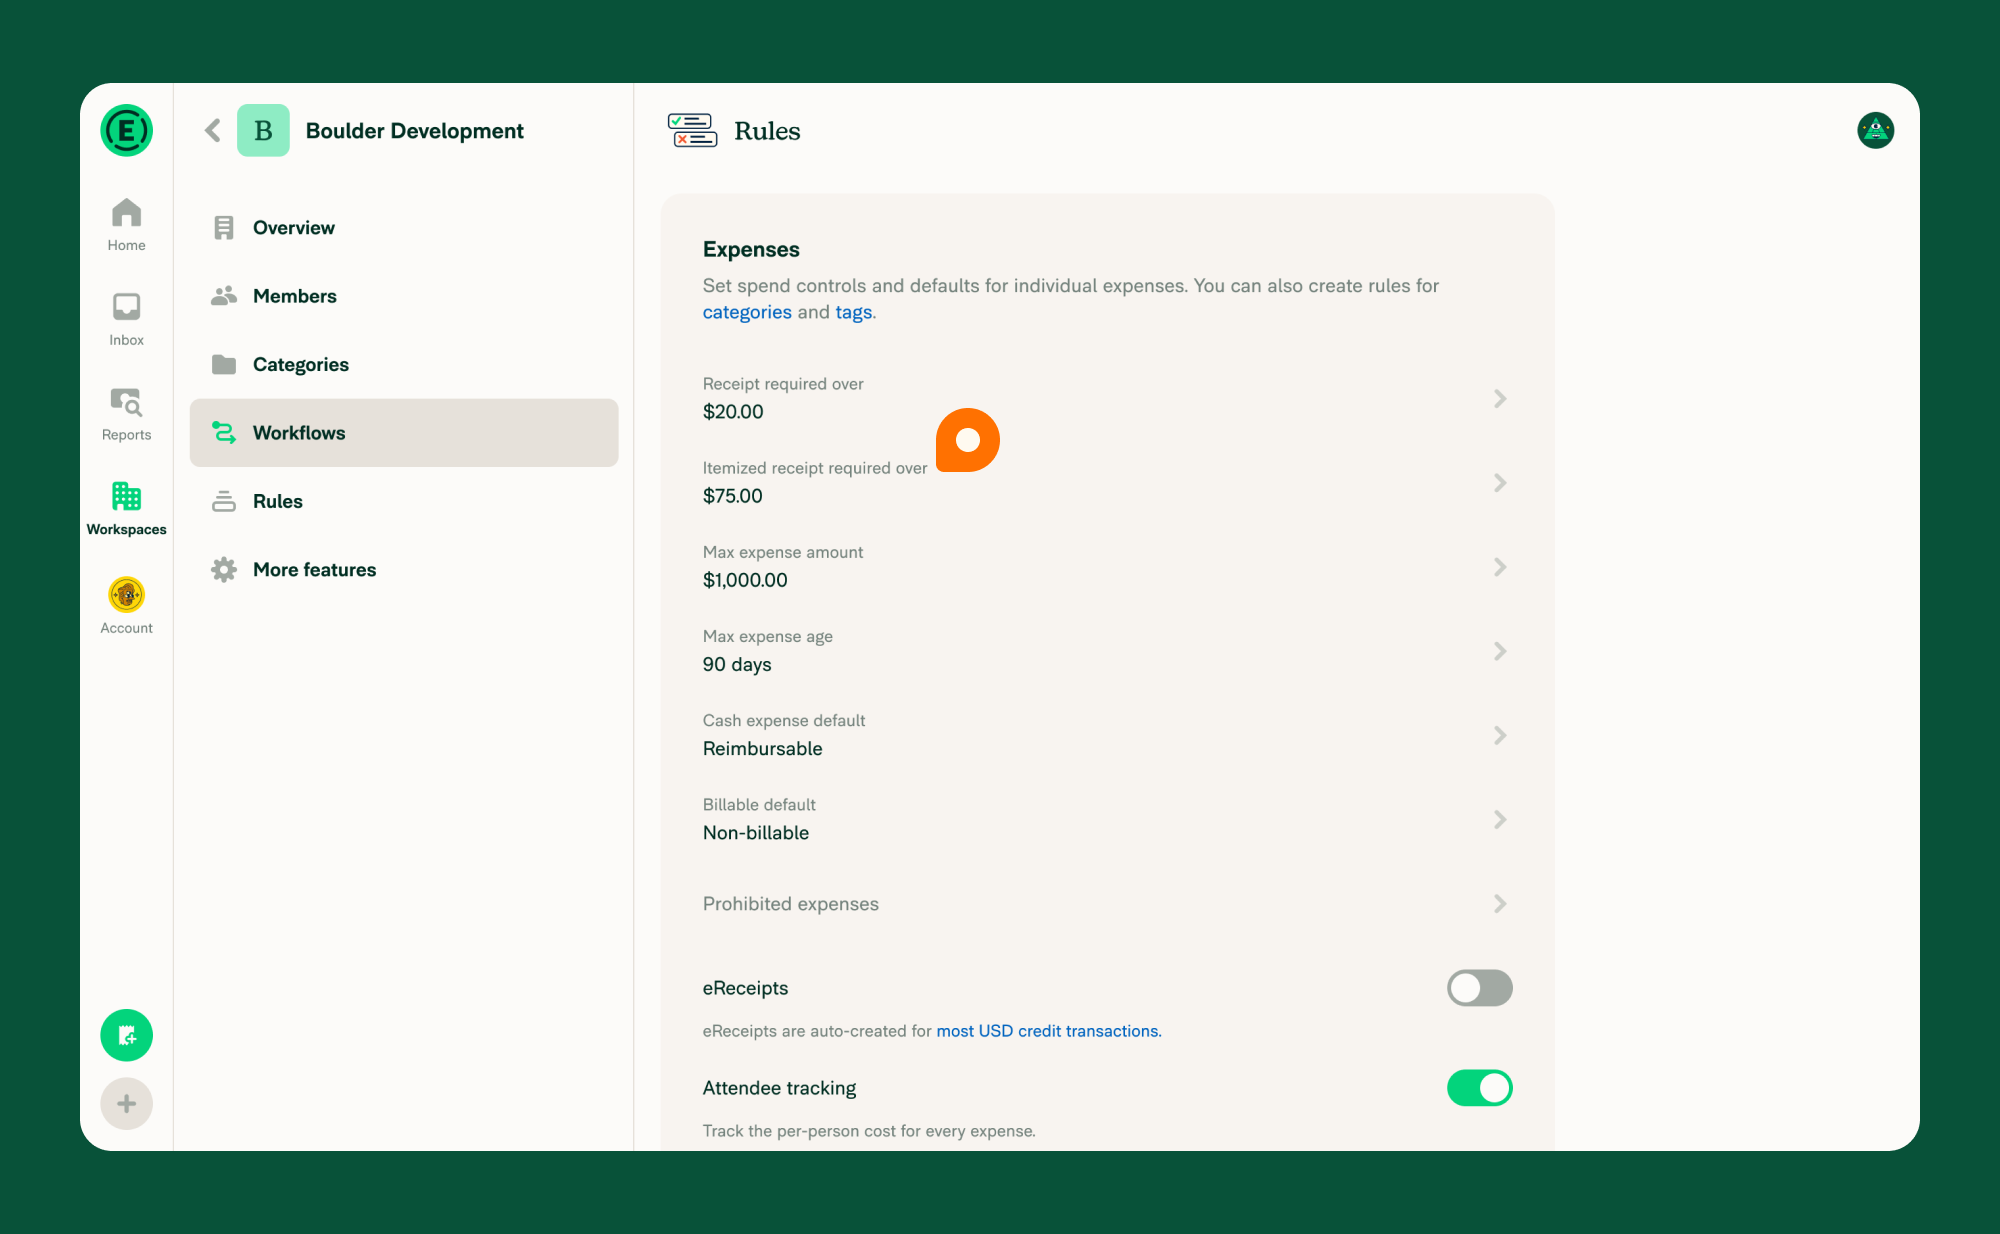
How to configure Expense Rules
Once enabled, go to the Rules tab in the left menu to manage expense-level settings.
Expense Rule options
- Receipt required amount – Set the minimum amount that requires a receipt (supports decimals).
- Itemized receipt required over – Require itemized receipts for expenses over a specific amount.
- Max expense amount – Set a per-expense spending cap (supports decimals).
- Max expense age (Days) – Define how old an expense can be (whole numbers only).
- Cash expense default - Choose whether cash expenses are reimbursable by default. Note: Workspace Merchant Rules can also set reimbursable status on a per-merchant basis.
- Billable default – Choose whether expenses are billable by default. Note: Workspace Merchant Rules can also set billable status on a per-merchant basis.
- Require company cards for all purchases - Flag out-of-pocket expenses that should have been made with a company card. Only available after company cards are connected to the workspace.
- eReceipts – Enable automatic receipt generation for all USD card transactions up to $75 (requires USD as default currency).
- Merchant-based automation – Automatically apply categories, tags, and other fields using Workspace Merchant Rules.
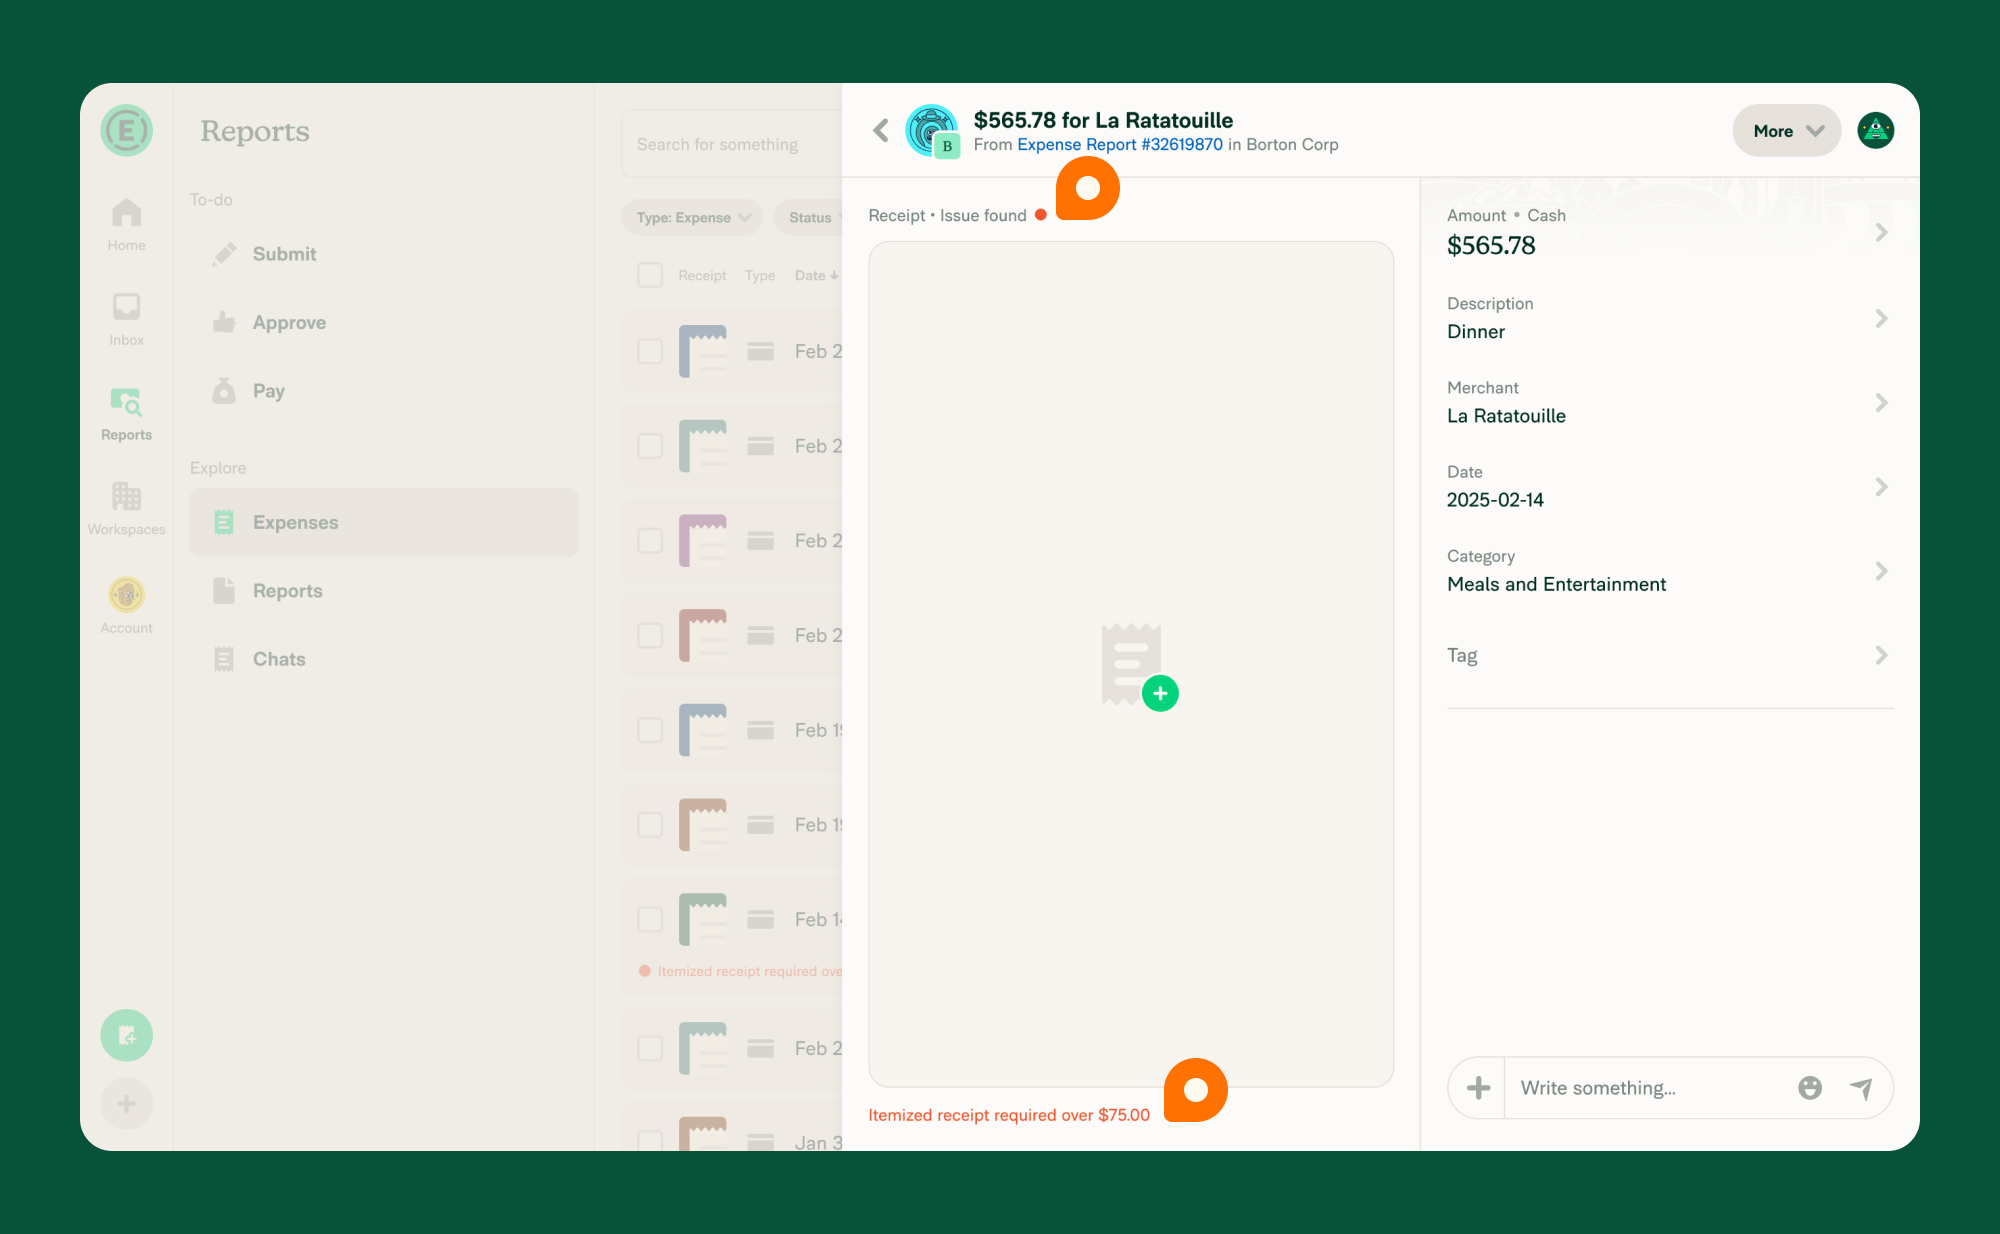
What happens if Expense Rules are broken
When an expense breaks a Workspace Rule or Category Rule, the expense is flagged with a violation and the approver is prompted to manually review it before approval.
How to configure Workspace Merchant Rules
Workspace Merchant Rules let Workspace Admins automatically apply consistent coding to expenses based on the merchant name. These rules help standardize categories, tags, and other expense fields across all members, reducing manual cleanup and improving reporting consistency.
Workspace Merchant Rules:
- Apply when an expense is created
- Work at the workspace level (not per member)
- Don’t change how members submit expenses
To learn how to set up and manage Workspace Merchant Rules, see: Workspace Merchant Rules
How to configure Spend rules for Expensify Cards
Spend rules let Workspace Admins approve or decline Expensify Card transactions in realtime based on the merchant, spend category, and amount of each charge. They appear in the Spend section of the Rules tab and only show after the Expensify Card is enabled for the workspace.
Every Expensify Card includes built-in protection that always declines these charges:
- Adult services
- ATMs
- Gambling
- Money transfers
To add your own spend rule:
- In the navigation tabs (on the left on web, and at the bottom on mobile), click Workspaces.
- Click your workspace name.
- Click Rules.
- In the Spend section, click Add spend rule.
- Set the Restriction type:
- Allow – Charges are approved if they match any merchant or category, and don’t exceed a max amount.
- Block – Charges are declined if they match any merchant or category, or exceed a max amount.
- (Optional) Click Add merchant to restrict by merchant name, then choose a Match type of Contains or Matches exactly.
- (Optional) Set a Spend category to restrict.
- (Optional) Set a Max amount. Any charge over this amount is declined, regardless of the merchant and spend category restrictions.
- Click Choose cards to select which Expensify Cards the rule applies to.
- Click Save rule.
To edit or delete an existing rule, click the rule in the Spend section, make your changes, and click Save rule or Delete rule.
You can also apply a spend rule to a card while issuing a new Expensify Card.
How to configure the Prohibited Expenses Rule
Use this AI-powered rule to flag receipts with restricted purchases.
To enable it:
- Go to Workspaces > [Workspace Name] > Rules > Expenses.
- Scroll to the Prohibited Expenses section.
- Toggle it on and select any categories to monitor:
- Alcohol
- Gambling
- Handwritten receipts
- Hotel Incidentals
- Tobacco
- Adult Entertainment
Note: Violations appear in both New Expensify and Expensify Classic, but the rule must be enabled in New Expensify.
How to configure Expense Report rules
Use these settings to control how entire reports are named, routed, and approved.
Available options:
- Custom report names – Define naming templates for new reports.
- Prevent self-approvals – Block users from approving their own reports.
- Auto-approve compliant reports – Automatically approve reports under a set amount and randomly audit others.
- Auto-Pay approved reports – Automatically reimburse reports under a threshold when they’re approved.
How to configure Category Rules
Category Rules let you fine-tune how individual categories behave.
To manage them:
- Go to Workspaces > [Workspace Name] > Categories.
- Click on a category to open its settings.
Available options:
- Approver – Assign a specific approver for expenses in this category.
- Default tax rate – Set a default tax percentage (Taxes must be enabled on the workspace).
- Flag amounts over - Set a spending cap for this category.
- Require receipts over – Set a threshold for when receipts are required.
- Require itemized receipts over – Require itemized receipts for expenses over a specific amount.
- Require fields - Require specific fields be completed for this category. The options are:
- Require description - Force members to enter a reason when using the category.
- Require attendees - Force members to add additional attendees when using the category.
How to configure Tag Rules
Tag Rules allow tagging-based workflows and approvals.
To manage them:
- Go to Workspaces > [Workspace Name] > Tags.
- Click a tag to open its settings.
Available option:
- Tag Approver – Assign a reviewer for expenses with this tag.
How to manage default categories and billable behavior
You can set workspace-wide defaults to automate categorization and tagging.
- Default categories – Auto-assign a category based on the merchant’s MCC (Merchant Category Code). This is configured under Categories > Settings, not under Rules. See Create Expense Categories.
- Billable expenses – Decide when tagging is required based on whether an expense is marked billable. Set this under Tags > Settings.
Note: Default category and billable settings use general automation logic. If you need consistent, merchant-specific outcomes that apply across all members, use Workspace Merchant Rules instead.
FAQ
Who can manage workspace rules?
Only Workspace Admins on the Control plan can enable, update, or disable workspace rules.
What happens if I turn workspace rules off?
Disabling workspace rules removes any active warnings or violations from draft or outstanding expenses that relied on those rules.
Can I disable SmartScan for my workspace?
No, SmartScan can’t be disabled for group (paid) workspaces and cannot be turned off.
When does the “Company card purchases required” violation appear?
This violation is triggered when an expense meets any of the following conditions:
- It’s created as cash and is older than seven days
- It’s imported from a personal card feed
- It’s manually changed from a card expense to a cash expense
Why don’t I see the toggle for the company card rule?
The Require Company Card for All Purchases rule only appears after at least one company card feed is connected to the workspace. If all company card feeds are removed, the rule will automatically disable.
Why don’t I see the Spend section in Rules?
The Spend section only appears after the Expensify Card is enabled for the workspace. Enable it under Workspaces > [Workspace Name] > More features, then return to the Rules tab.
What happens if I disable eReceipts?
Disabling eReceipts hides any previously generated eReceipts. Re-enabling the feature will restore those receipts.
Will disabling rules affect submitted or approved expenses?
No. Disabling a rule only affects expenses that are in draft or awaiting submission. Submitted or approved expenses remain unchanged.
What happens if a Category or Tag Rule conflicts with a Workspace Rule?
Category and Tag Rules take priority over Workspace Rules. When both apply to the same expense, the category-specific setting is used