Quickbooks Online Troubleshooting
If you’re encountering errors when exporting expenses from Expensify to QuickBooks Online, this guide will help you understand the cause and provide step-by-step solutions.
ExpensiError QBO022: Billable Expenses Not Enabled
Why does this happen?
This error occurs when the account category applied to an expense in Expensify is not marked as billable in QuickBooks Online.
How to Fix It
- Log in to QuickBooks Online.
- Click the Gear icon in the upper-right corner.
- Select Expenses under Company Settings.
- Enable Make expenses and items billable.
- Click the pencil icon and check if In multiple accounts is selected.
- If enabled, go to Chart of Accounts and click Edit on the relevant account.
- Mark the account as billable and select an income account.
- Sync your QuickBooks Online connection:
Settings > Workspaces > [Workspace Name] > Accounting. - Reattempt exporting: Open the report, click Export, and select QuickBooks Online.
ExpensiError QBO046: Feature Not Included in Subscription
Why does this happen?
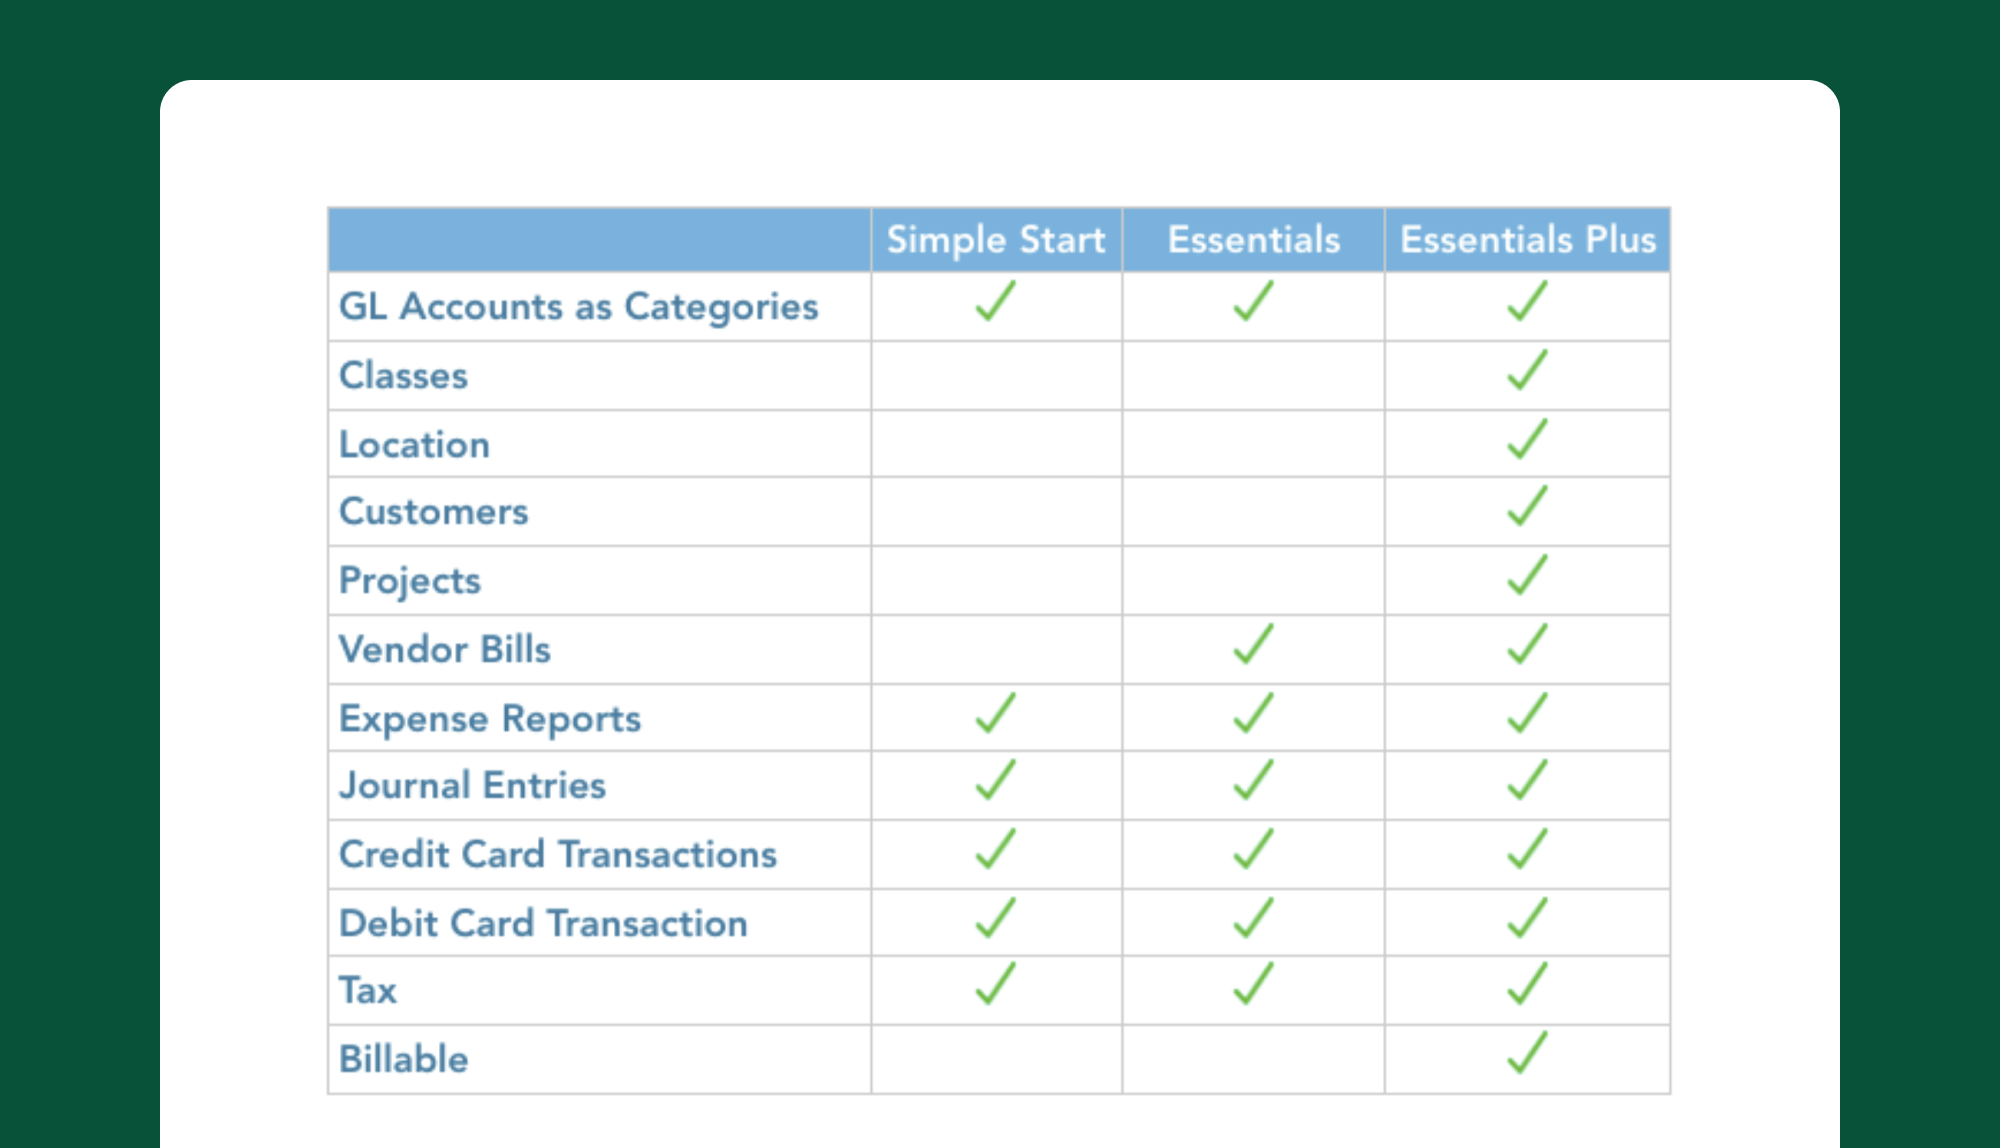
Your QuickBooks Online plan does not support the feature you’re using in Expensify.
How to Fix It
- Check your QuickBooks Online subscription plan to verify which features are supported.
Note: QuickBooks Self-Employed is not supported. -
Refer to the table below for supported features:

ExpensiError QBO088: Error Creating Vendor
Why does this happen?
This occurs when a submitter has an Employee Record in QuickBooks Online, preventing Expensify from creating a Vendor Record with the same name.
How to Fix It
Option 1: Edit Employee Name
- Log in to QuickBooks Online.
- Go to Employee Records.
- Edit the employee’s name to differentiate it from their Expensify account.
- If you already have a vendor record for your employees, make sure there is an email on the profile that is an exact match with their Expensify login.
- Sync your QuickBooks Online connection.
- Reattempt exporting.
Option 2: Manually Create Vendor Records
- Log in to QuickBooks Online.
- Manually create Vendor Records with emails matching the ones in Expensify.
- Disable Automatically Create Entities:
Settings > Workspaces > [Workspace Name] > Accounting > Configure > Advanced.
ExpensiError QBO097: Accounts Payable Requires Vendor Selection
Why does this happen?
This error occurs when exporting reimbursable expenses as Journal Entries to an Accounts Payable (A/P) account while Employee Records are in use.
How to Fix It
You have three options:
- Change the export type for reimbursable expenses:
Settings > Workspaces > [Workspace Name] > Accounting > Configure > Export. - Enable Automatically Create Entities:
Settings > Workspaces > [Workspace Name] > Accounting > Configure > Advanced. - Manually create vendor records in QuickBooks Online.
ExpensiError QBO099: Billable Items Require Sales Information
Why does this happen?
This occurs when an Item category on an expense lacks sales information in QuickBooks Online.
How to Fix It
- Log in to QuickBooks Online.
- Go to Items List.
- Click Edit next to the item used on the report.
- Enable Sales.
- Assign an Income Account.
- Save changes.
- Sync your QuickBooks Online connection.
- Reattempt exporting.
ExpensiError QBO193: Couldn’t Connect to QuickBooks Online
Why does this happen?
This error occurs when the QuickBooks Online credentials used to establish the connection have changed.
Alternate error message: “QuickBooks Reconnect Error: OAuth Token Rejected.”
How to Fix It
- Go to Settings > Workspaces > [Workspace Name] > Accounting.
- Click Sync Now.
- In the pop-up window, click Reconnect and enter your QuickBooks Online credentials.
- If using new credentials, reconfigure your settings and reselect your categories/tags.
Tip: Take a screenshot of your configuration before reconnecting.
ExpensiError QBO077: Duplicate Document Number
Why does this happen?
This error occurs when QuickBooks Online has duplicate document number warnings enabled.
How to Fix It
- Log in to QuickBooks Online.
- Go to Settings > Advanced.
- Under Other Preferences, set Warn if duplicate bill number is used to Off.
- Sync your QuickBooks Online connection.
- Reattempt exporting.
Export Error: Currency Mismatch for A/R and A/P Accounts
Why does this happen?
The currency on the Vendor Record in QuickBooks Online does not match the currency on the A/P account.
How to Fix It
- Log in to QuickBooks Online.
- Open the Vendor Record.
- Ensure the vendor’s currency matches the A/P account currency.
- Export your QuickBooks Online vendor list to a spreadsheet and search for the email address of the submitter.
- If multiple vendors have the same email but different currencies, remove the email from the incorrect vendor.
- Sync your QuickBooks Online connection.
- Reattempt exporting.
If the issue persists, confirm the A/P account currency:
- Navigate to Settings > Workspaces > [Workspace Name] > Accounting.
- Under Exports, verify that both A/P accounts have the correct currency.
Why Are Company Card Expenses Exporting to the Wrong Account?
Possible Causes:
- Incorrect Card Mapping:
- Confirm that company cards are correctly mapped in Settings > Domains > Company Cards.
- Click Edit Export for the card to check its assigned account.
- Expense Source:
- Expenses imported directly from a company card (marked with a Card+Lock icon) follow domain mapping settings.
- Expenses created via SmartScan or manually as cash expenses export to the default bank account.
- Exporter Must Be a Domain Admin:
- Verify that the person exporting the report is a Domain Admin.
- If reports export automatically via Concierge, the Preferred Exporter in Settings > Workspaces > [Workspace Name] > Accounting > Configure must be a Domain Admin.
- Workspace Selection:
- If multiple workspaces are connected to QuickBooks Online, ensure the correct one is selected.
- Each workspace has a separate list of export accounts.
- If multiple workspaces are connected to QuickBooks Online, ensure the correct one is selected.
FAQ
Can I Export Negative Expenses to QuickBooks Online?
Yes, you can export negative expenses regardless of the export method.
Exception: If Check is selected as the export method, the total report amount cannot be negative.


