


Configure Netsuite
Correctly configuring NetSuite settings in Expensify ensures seamless integration between your expense management and accounting processes, saving time and reducing manual errors. Aligning your workspace settings with NetSuite’s financial structure can automate data syncs, simplify reporting, and improve overall financial accuracy.
Best Practices for using NetSuite with Expensify
When you connect Expensify to NetSuite, you unlock a powerful combination of expense management and accounting automation. Follow these best practices to keep your data flowing smoothly and reduce manual effort.
Set up your connection properly
- After connecting NetSuite, immediately review and configure all relevant tabs under the integration settings.
- Make sure each setting reflects your accounting structure in NetSuite.
Keep Auto Sync enabled
Auto Sync ensures your data stays up to date without manual intervention:
- Expensify will sync daily with NetSuite to pull updates to your chart of accounts, customers/projects, and bank accounts.
- When reports are marked as finalized in Expensify, they will automatically export to NetSuite—saving your admin team time.
Choose the right exporter
- Set the preferred exporter as someone who is both a workspace admin and a domain admin.
- This ensures they have the right access to manage both the integration and financial exports.
Enforce expense coding rules
- Go to Settings > Workspaces > [Workspace Name] > Categories and Tags.
- Require members to select categories and tags before submitting expenses.
- Learn how to require categories and tags on expenses →
Configure Export Settings
There are numerous options for exporting Expensify reports to NetSuite. To access these settings, go to Settings > Workspace > Group > Accounting and select the Configure button.
Subsidiary
The subsidiary selection will only appear if you use NetSuite OneWorld and have multiple subsidiaries active. If you add a new subsidiary to NetSuite, sync the workspace connection, and the new subsidiary should appear in the dropdown list under Settings > Workspaces > [Workspace Name] > Accounting.
Preferred Exporter
This option allows any admin to export, but the preferred exporter will receive notifications in Expensify regarding the status of exports.
Date
The three options for the date your report will export with are:
- Date of last expense: This will use the date of the previous expense on the report
- Submitted date: The date the employee submitted the report
- Exported date: The date you export the report to NetSuite
Accounting Method
This dictates when reimbursable expenses will be exported, according to your preferred accounting method:
- Accrual: Out-of-pocket expenses will be exported immediately when the report is final approved
- Cash: Out-of-pocket expenses will be exported when paid via Expensify or marked as paid
Export Settings for Reimbursable Expenses
Expense Reports: Expensify transactions will export reimbursable expenses as expense reports by default, which will be posted to the accounts payable designated in NetSuite.
Vendor Bills: Expensify transactions export as vendor bills in NetSuite and are mapped to the subsidiary associated with the corresponding workspace. Each report is posted as payable to the vendor associated with the employee who submitted it. You can also set an approval level in NetSuite for vendor bills.
Journal Entries: Expensify transactions that are set to export as journal entries in NetSuite will be mapped to the subsidiary associated with this workspace. All the transactions will be posted to the payable account specified in the workspace. You can also set an approval level in NetSuite for the journal entries.
- Journal entry forms by default do not contain a customer column, so it is not possible to export customers or projects with this export option
- The credit line and header level classifications are pulled from the employee record
Export Settings for Non-Reimbursable Expenses
Vendor Bills: Non-reimbursable expenses will be posted as a vendor bill payable to the default vendor specified in your workspace’s connection settings. If you centrally manage your company cards through Domains, you can export expenses from each card to a specific vendor in NetSuite. You can also set an approval level in NetSuite for the bills.
Journal Entries: Non-reimbursable expenses will be posted to the Journal Entries posting account selected in your workspace’s connection settings. If you centrally manage your company cards through Domains, you can export expenses from each card to a specific account in NetSuite.
- When automatic reconciliation is enabled, Expensify Card expenses will always export as individual, itemized Journal Entries, regardless of Expense Reports or Vendor Bills settings configured for non-reimbursable expenses on the Export tab.
- Without automatic reconciliation, Expensify Card expenses will export using the export type configured for non-reimbursable expenses on the Export tab.
- Expensify Card expenses exported as Journal Entries will always export as individual, itemized Journal Entries, regardless of whether the one journal entry for all items on report setting is enabled.
- Journal entry forms do not contain a customer column, so it is not possible to export customers or projects with this export option
- The credit line and header level classifications are pulled from the employee record
Expense Reports: To use the expense report option for your corporate card expenses, you must set up your default corporate cards in NetSuite.
To use a default corporate card for non-reimbursable expenses, you must select the correct card on the employee records (for individual accounts) or the subsidiary record (If you use a non-One World account, the default is found in your accounting preferences).
Add the corporate card option and corporate card main field to your expense report transaction form in NetSuite by:
- Heading to Customization > Forms > Transaction Forms > Preferred expense report form > Screen Fields
- Under the Main tab, check “Show” for Account for Corporate Card Expenses
- On the Expenses tab, check “Show” for Corporate Card
You can select the default account on your employee record to use individual corporate cards for each employee. Make sure you add this field to your employee entity form in NetSuite. If you have multiple cards assigned to a single employee, you cannot export to each account. You can only have a single default per employee record.
Export Invoices
Select the Accounts Receivable account you want your Invoice Reports to export. In NetSuite, the Invoices are linked to the customer, corresponding to the email address where the Invoice was sent.
Default Vendor Bills
When selecting the option to export non-reimbursable expenses as vendor bills, the list of vendors will be available in the dropdown menu.
Configure Coding Settings
The Coding tab is where NetSuite information is configured in Expensify, which allows employees to code expenses and reports accurately. There are several coding options in NetSuite. Let’s go over each of those below.
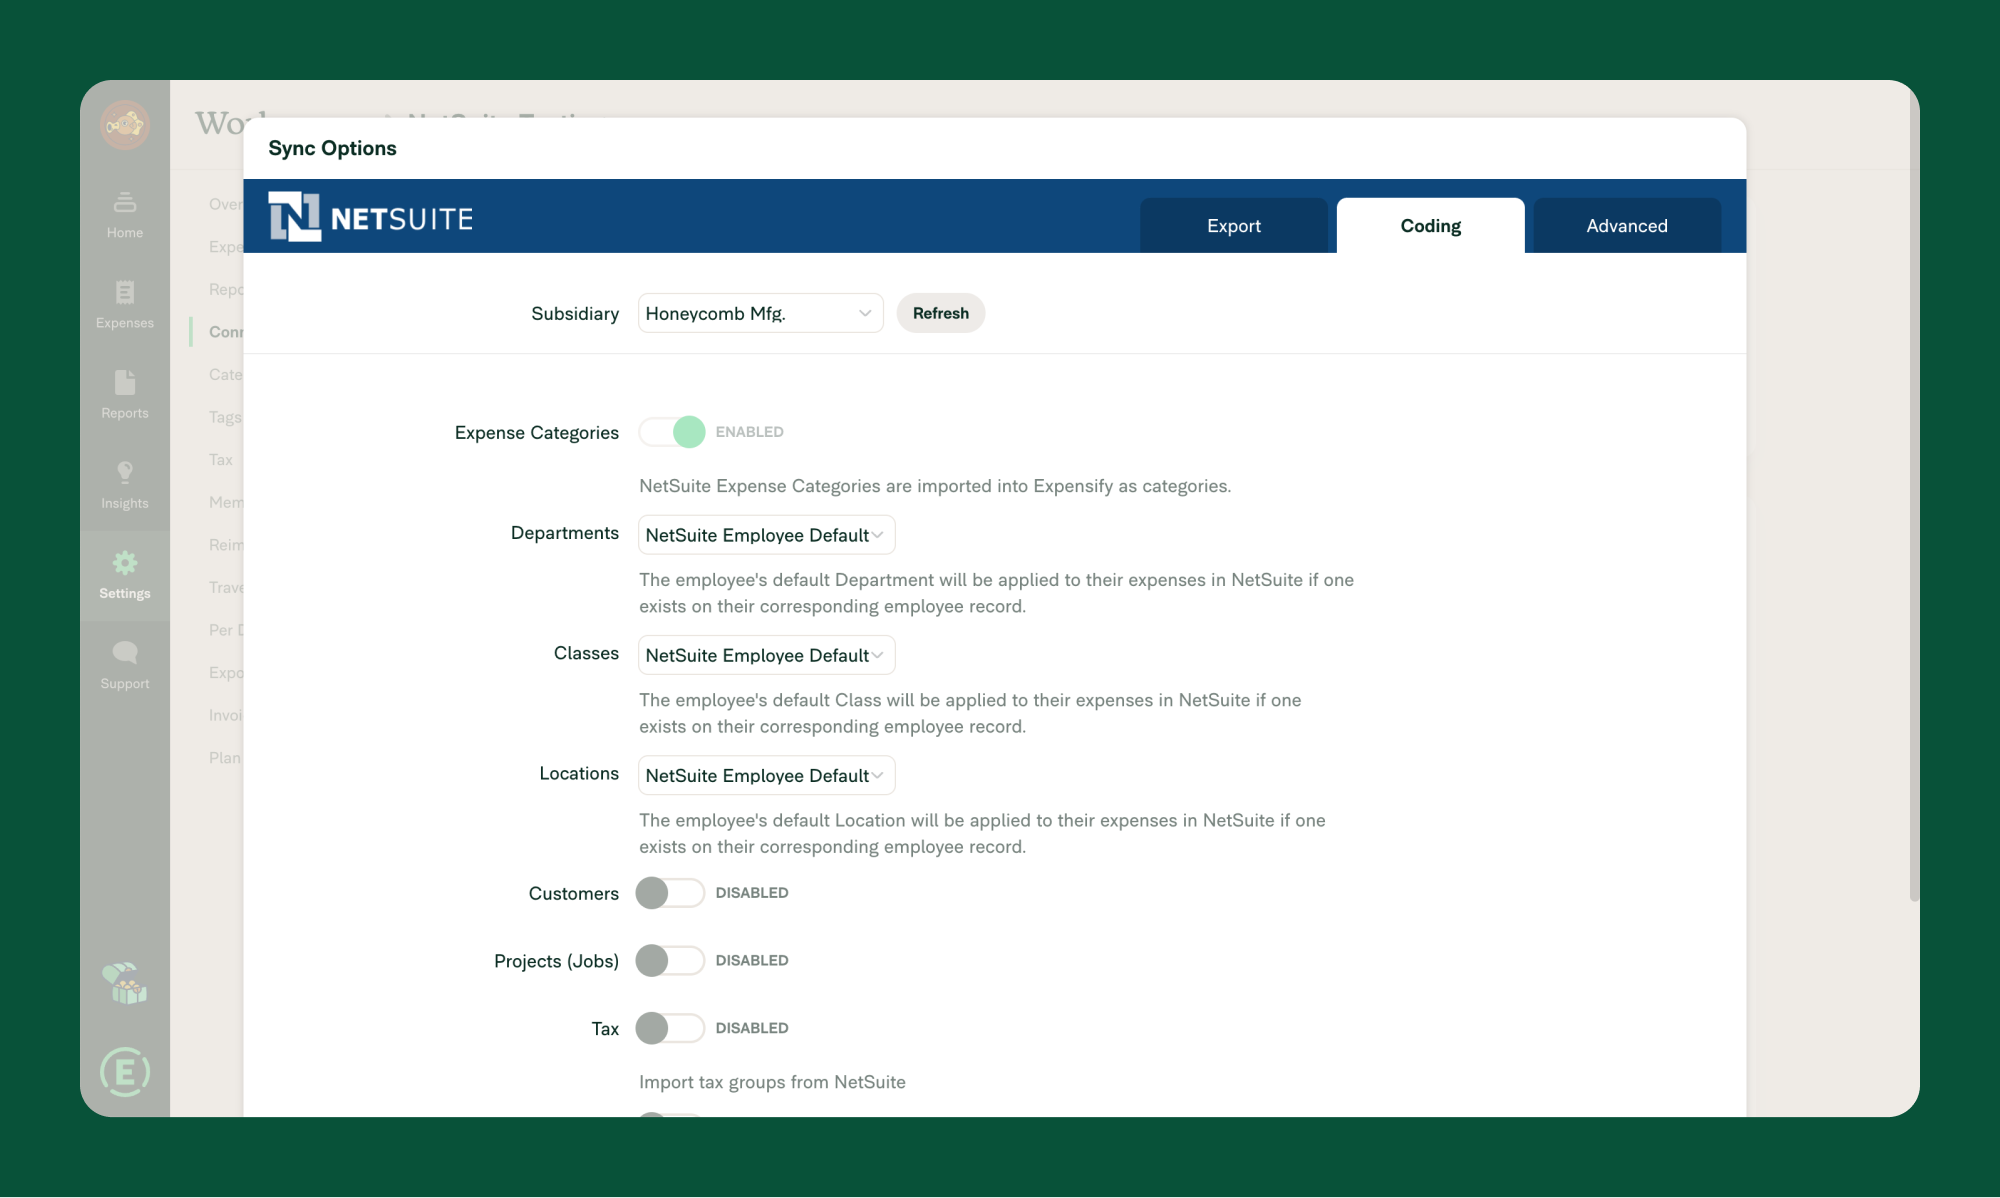
Expense Categories
Expensify’s integration with NetSuite automatically imports NetSuite Expense Categories as Categories in Expensify.
Please note that each expense must have a Category selected to export to NetSuite. The category chosen must be imported from NetSuite and cannot be manually created in Expensify.
If you want to delete Categories, you must do this in NetSuite. Categories are added and modified on the integration’s side and then synced with Expensify. Once imported, you can turn specific Categories on or off under Settings > Workspaces > [Workspace Name] > Categories.
Tags
The NetSuite integration allows you to configure Customers, Projects, Departments, Classes, and Locations as line-item expense classifications. These are called Tags in Expensify.
Suppose a default Customer, Project, Department, Class, or Location ties to the employee record in NetSuite. In that case, Expensify will create a rule that automatically applies that tag to all expenses made by that employee (the Tag is still editable if necessary).
If you want to delete Tags, you must do this in NetSuite. Tags are added and modified on the integration’s side and then synced with Expensify.
Once imported, you can turn specific Tags on or off under Settings > Workspaces > [Workspace Name] > Tags.
Report Fields
The NetSuite integration allows you to configure Customers, Projects, Departments, Classes, and Locations as report-level classifications. These are called Report Fields in Expensify.
NetSuite Employee Default
The NetSuite integration allows you to set Departments, Classes, and Locations according to the NetSuite Employee Default for expenses exported as both Expense Reports and Journal Entries.
These fields must be set in NetSuite’s employee(s) record(s) to be successfully applied to expenses upon export.
You cannot use the employee default setting with a vendor bill export if you have both a vendor and an employee set up for the user under the same email address and subsidiary.
Tax
The NetSuite integration allows users to apply a tax rate and amount to each expense. To do this, import Tax Groups from NetSuite:
- In NetSuite, head to Setup > Accounting > Tax Groups
- Once imported, go to the NetSuite connection configuration page in Expensify (under Settings > Workspaces > Group > [Workspace Name] > Connection > NetSuite > Coding), refresh the subsidiary list, and the Tax option will appear
- From there, enable Tax
- Click Save
- Sync the connection
- All Tax Groups for the connected NetSuite subsidiary will be imported to Expensify as taxes.
- After syncing, go to Settings > Workspace > Group > [Workspace Name] > Tax to see the tax groups imported from NetSuite
- Use the turn on/off button to choose which taxes to make available to your employees
- Select a default tax to apply to the workspace (that tax rate will automatically apply to all new expenses)
You can import Custom Segments, Custom Records, and Custom Lists from NetSuite to use as Tags or Report Fields in Expensify. Here’s how to locate the required fields in NetSuite and complete the setup in Expensify.
Custom Segments
To add a Custom Segment to your workspace, you’ll need:
- Segment name
- Internal ID
- Script/Field ID
Find the Segment name
- Log in as an Administrator in NetSuite.
- Go to Customization > Lists, Records, & Fields > Custom Segments.
- Locate the Segment Name on the Custom Segments page.
Find the Internal ID
- Make sure Internal IDs are enabled in NetSuite: Go to Home > Set Preferences and check Show Internal IDs.
- Return to the Custom Segments page.
- Click the Custom Record Type link next to the segment.
- The Internal ID is listed on the Custom Record Type page.
Find the Script/Field ID
Note: As of NetSuite 2019.1, new segments use a unified ID. Older segments may show the “Use as Field ID” checkbox.
- If the segment is configured as a Report Field, check the Transactions tab under Custom Segments > Transactions for the Field ID.
- If configuring as a Tag, use the Field ID from the Transaction Columns tab under Custom Segments > Transaction Columns.
- If no Field ID is shown, use the unified ID (labeled just “ID”).
Set up in Expensify
- Go to Settings > Workspaces > Group > [Workspace Name] > Accounting > Configure > Coding tab.
- Choose to import the segment as a Report Field or Tag.
- Enter the:
- Segment name
- Internal ID
- Script/Field ID
- Click Submit.
The values should now display under the Tag or Report Field settings in Expensify.
Important:
Avoid using the “Filtered by” feature in NetSuite. Expensify does not support field dependencies. If filtering is necessary, set it to Subsidiary and enable all subsidiaries to avoid export errors.
Custom Records
Custom Records are tied to Custom Segments and are imported similarly.
You’ll need:
- Record name
- Internal ID
- Transaction Column ID
Find the Internal ID
- Enable Internal IDs in NetSuite: Go to Home > Set Preferences and enable Show Internal IDs.
- Return to the Custom Segments page.
- Click the Custom Record Type link.
- Locate the Internal ID on that page.
Find the Transaction Column ID
- If importing as a Report Field, check the Transactions tab.
- If importing as a Tag, check the Transaction Columns tab.
Set up in Expensify
- Go to Settings > Workspaces > [Workspace Name] > Accounting > Configure > Coding tab.
- Choose to import as a Report Field or Tag.
- Enter the:
- Record name
- Internal ID
- Transaction Column ID
- Click Submit.
Once complete, the record values appear under Tags or Report Fields.
Custom Lists
For Custom Lists, you’ll need:
- Record name
- Transaction Line Field ID
Find the Record name
- Log into Expensify.
- Navigate to Settings > Workspaces > [Workspace Name] > Accounting > Configure > Coding tab.
- The record name appears in the dropdown.
If not listed, click Refresh Custom List Options.
Find the Transaction Line Field ID
- Log into NetSuite.
- Use the global search to find “Transaction Line Fields.”
- Select the record holding the list to see its ID.
Set up in Expensify
- Go to Settings > Workspaces > [Workspace Name] > Accounting > Configure > Coding tab.
- Choose to import as a Report Field or Tag.
- Enter the Transaction Line Field ID.
- Click Submit.
Values from your Custom Lists should now appear in Expensify.
Configure Advanced Settings
The NetSuite integration’s advanced configuration settings are accessed under Settings > Workspaces > [Workspace Name] > Accounting > NetSuite > Configure > Advanced tab.
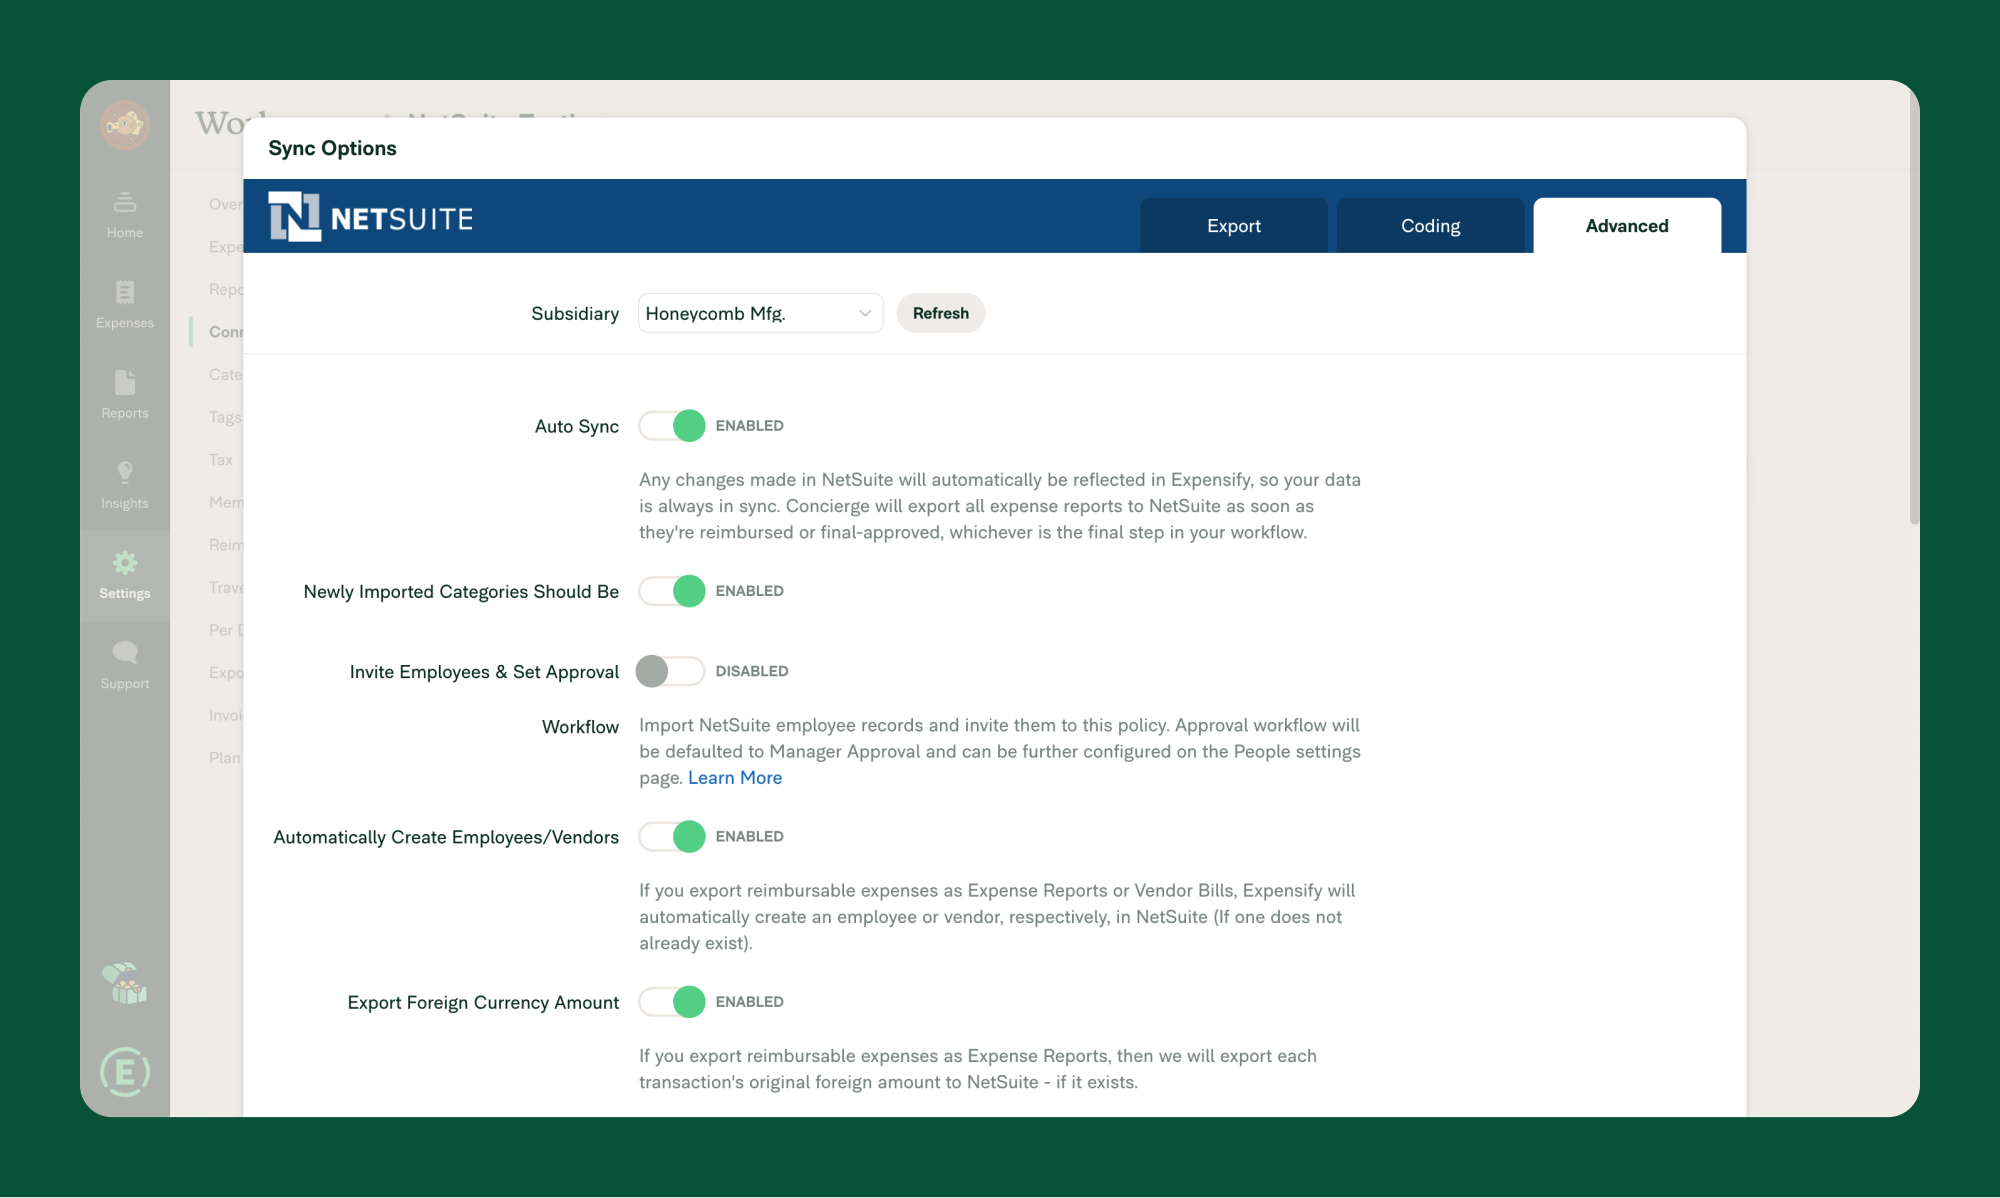
Auto Sync
Enabling Auto Sync ensures that the information in NetSuite and Expensify is always in sync through automating exports, tracking direct deposits, and communicating export errors.
Automatic Export:
- When you turn on the Auto Sync feature in Expensify, any final report you approve will automatically be sent to NetSuite.
- This happens every day at approximately the same time.
Direct Deposit Alert:
- If you use Expensify’s Direct Deposit ACH and have Auto Sync, getting reimbursed for an Expensify report will automatically create a Bill Payment in NetSuite.
Tracking Exports and Errors:
- In the comments section of an Expensify report, you can find extra details about the report.
- The comments section will tell you when the report was sent to NetSuite, and if there were any problems during the export, it will show the error.
Newly Imported Categories
With this enabled, all submitters can add any newly imported Categories to an Expense.
Invite Employees & Set Approval Workflow
Invite Employees: Use this option in Expensify to bring your employees from a specific NetSuite subsidiary into Expensify. Once imported, Expensify will send them an email letting them know they’ve been added to a workspace.
Set Approval Workflow: In addition to inviting employees, you can establish an approval process in NetSuite. The Approval Workflow in Expensify will automatically follow the same rules as NetSuite, typically starting with Manager Approval.
The available options are:
- Basic Approval: This is a single level of approval, where all users submit directly to a Final Approver. The Final Approver defaults to the workspace owner but can be edited on the people page.
- Manager Approval (default): Two levels of approval route reports first to an employee’s NetSuite expense approver or supervisor, and second to a workspace-wide Final Approver. By NetSuite convention, Expensify will map to the supervisor if no expense approver exists. The Final Approver defaults to the workspace owner but can be edited on the people page.
- Configure Manually: Employees will be imported, but all levels of approval must be manually configured on the workspace’s People settings page. If you enable this setting, it’s recommended you review the newly imported employees and managers on the Settings > Workspaces > [Workspace Name] > People page. You can set a user role for each new employee and enforce an approval workflow.
Automatically Create Employees/Vendors
With this feature enabled, Expensify will automatically create a new employee or vendor (if one doesn’t already exist) from the report submitter’s email in NetSuite.
Export Foreign Currency Amount
Using this feature allows you to send the original amount of the expense rather than the converted total when exporting to NetSuite. This option is available if you are exporting reimbursable expenses as Expense Reports.
Cross-Subsidiary Customers/Projects
This allows you to import Customers and Projects across all subsidiaries to a single group workspace. To enable this functionality in NetSuite, you must enable Intercompany Time and Expense.
That feature is found in NetSuite under Setup > Company > Setup Tasks: Enable Features > Advanced Features.
Sync Reimbursed Reports
If you’re using Expensify’s Direct Deposit ACH feature and you want to export reimbursable expenses as either Expense Reports or Vendor Bills in NetSuite, here’s what to do:
- In Expensify, go to the Advanced Settings tab
- Look for a toggle or switch related to this feature
- Turn it on by clicking the toggle
- Select the correct account for the Bill Payment in NetSuite
- Ensure the account you choose matches the default account for Bill Payments in NetSuite
That’s it! When Expensify reimburses an expense report, it will automatically create a corresponding Bill Payment in NetSuite.
Alternatively, if reimbursing outside of Expensify, this feature will automatically update the expense report status in Expensify from Approved to Reimbursed when the respective report is paid in NetSuite and the corresponding workspace syncs via Auto-Sync or when the integration connection is manually synced.
Setting Approval Levels
With this setting enabled, you can set approval levels based on your export type.
- Expense Reports: These options correspond to the default preferences in NetSuite – “Supervisor approval only,” “Accounting approval only,” or “Supervisor and Accounting approved.”
- Vendor Bills or Journal Entries: These options correspond to the default preferences in NetSuite – “Pending Approval” or “Approved for Posting.”
If you have Approval Routing selected in your accounting preference, this will override the selections in Expensify.
If you do not wish to use Approval Routing in NetSuite, go to Setup > Accounting > Accounting Preferences > Approval Routing and ensure Vendor Bills and Journal Entries are not selected.
Collection Account
When exporting invoices, once marked as Paid, the payment is marked against the account selected after enabling the Collection Account setting.
Additional Settings
Categories
You can use the Auto-Categorization feature so that expenses are automatically categorized.
To set Category Rules (e.g., receipt requirements or comments), go to the categories page in the workspace under Settings > Workspaces > [Workspace Name] > Categories.
With this setting enabled, when an Expense Category updates in NetSuite, it will update in Expensify automatically.
Company Cards
NetSuite’s company card feature simplifies exporting reimbursable and non-reimbursable transactions to your General Ledger (GL). This approach is recommended for several reasons:
- Separate Employees from Vendors: NetSuite allows you to maintain separate employee and vendor records. This feature proves especially valuable when integrating with Expensify. By utilizing employee defaults for classifications, your employees won’t need to apply tags to all their expenses manually.
- Default Accounts Payable (A/P) Account: Expense reports enable you to set a default A/P account for export on your subsidiary record. Unlike vendor bills, where the A/P account defaults to the last selected account, the expense report export option allows you to establish a default A/P account.
- Mix Reimbursable and Non-Reimbursable Expenses: You can freely mix reimbursable and non-reimbursable expenses without categorizing them in NetSuite after export. NetSuite’s corporate card feature automatically categorizes expenses into the correct GL accounts, ensuring a neat and organized GL impact.
Let’s go over an example!
Consider an expense report with one reimbursable and one non-reimbursable expense. Each needs to be exported to different accounts and expense categories.
In NetSuite, you can quickly identify the non-reimbursable expense marked as a corporate card expense. When reviewing the GL impact, you’ll see that the reimbursable expense is posted to the default A/P account set on the subsidiary record. On the other hand, the company card expense is assigned to the Credit Card account, which can either be set as a default on the subsidiary record (for a single account) or the employee record (for individual credit card accounts in NetSuite).
Furthermore, each expense is categorized according to your selected expense category.
To use the expense report option for your corporate card expenses, you’ll need to set up default corporate cards in NetSuite.
For non-reimbursable expenses, choose the appropriate card on the subsidiary record. You can find the default in your accounting preferences if you’re not using a OneWorld account.
Add the corporate card option and the corporate card main field to configure your expense report transaction form in NetSuite:
- Go to Customization > Forms > Transaction Forms > Preferred expense report form > Screen Fields
- Under the Main tab, check Show for Account for Corporate Card Expenses
- On the Expenses tab, check Show for Corporate Card
If you prefer individual corporate cards for each employee, you can select the default account on the employee record. Add this field to your employee entity form in NetSuite (under Customize > Customize Form from any employee record). Note that each employee can have only one corporate card account default.
Exporting Company Cards to GL Accounts in NetSuite
If you need to export company card transactions to individual GL accounts, you can set that up at the domain level.
Let’s go over how to do that:
- Go to Settings > Domain > Company Cards
- Click the Export Settings cog on the right-hand side of the card and select the GL account where you want the expenses to export
After setting the account, exported expenses will be mapped to that designated account.
Tax
You’ll want to set up Tax Groups in Expensify if you’re keeping track of taxes.
Expensify can import NetSuite Tax Groups (not Tax Codes) from NetSuite. Tax Groups can contain one or more Tax Codes. If you have subsidiaries in the UK or Ireland, ensure your Tax Groups have only one Tax Code.
You can locate these in NetSuite by setting up> Accounting > Tax Groups. Name the Tax Groups something that makes sense to your employees, since both the name and the tax rate will appear in Expensify.
To bring NetSuite Tax Groups into Expensify, here’s what you need to do:
- Create your Tax Groups in NetSuite by going to Setup > Accounting > Tax Groups
- Click New
- Pick the country for your Tax Group
- Enter the Tax Name (this will be visible to your employees in Expensify)
- Next, select the subsidiary for this Tax Group
- Finally, from the table, choose the Tax Code you want to include in this Tax Group
- Click Add, then click Save
Repeat those steps for each tax rate you want to use in Expensify.
Next, ensure that Tax Groups can be applied to expenses:
- In NetSuite, head to Setup > Accounting > Set Up Taxes
- Set the preference for Tax Code Lists Include to either Tax Groups And Tax Codes or Tax Groups Only. If you don’t see this field, don’t worry; it means you don’t need to set it for that specific country
NetSuite has a pre-made list of tax groups for specific locations, but you can also create your own. We’ll import both your custom tax groups and the default ones. It’s important not to deactivate the default NetSuite tax groups because we rely on them to export specific types of expenses.
For example, there’s a default Canadian tax group called CA-Zero, which we use when exporting Distance and per diem expenses that don’t have any taxes applied in Expensify. Deactivating this group in NetSuite will lead to export errors.
Additionally, some tax nexuses in NetSuite have specific settings that need to be configured in a certain way to work seamlessly with the Expensify integration:
- In the Tax Code Lists Include field, choose Tax Groups or Tax Groups and Tax Codes. This setting determines how tax information is handled.
- In the Tax Rounding Method field, select Round Off. Although this setting won’t cause connection errors, not using it can result in exported amounts differing from what NetSuite expects.
If your tax groups are importing into Expensify but not exporting to NetSuite, could you check that each tax group has the right subsidiaries enabled? That is crucial for proper data exchange.
Multi-Currency
When using multi-currency features with NetSuite, remember these points:
Matching Currencies: The currency set for a vendor or employee record must match the currency chosen for the subsidiary in your Expensify configuration. This alignment is crucial for proper handling.
Foreign Currency Conversion: If you create expenses in one currency and then convert them to another currency within Expensify before exporting, you can include both the original and converted amounts in the exported expense reports. This option, called Export foreign currency amount, can be found in the Advanced tab of your configuration. Expensify sends only the amounts; the actual currency conversion is performed in NetSuite.
Bank Account Currency: When synchronizing bill payments, ensure your bank account’s currency matches the subsidiary’s. Failure to do so will result in an Invalid Account error. This alignment is necessary to prevent issues during payment processing.
Exporting Invoices
When you mark an invoice as paid in Expensify, the paid status syncs with NetSuite and vice versa.
To access this setting:
- Access Configuration Settings: Go to Settings > Workspace > [Workspace Name] > Accounting > Configuration
- Choose Your Accounts Receivable Account: Scroll down to Export Expenses to and select the appropriate Accounts Receivable account from the dropdown list. If you don’t see any options, try syncing your NetSuite connection by returning to the Accounting page and clicking Sync Now
Exporting an Invoice to NetSuite
Invoices will be automatically sent to NetSuite when they are in the Outstanding or Paid status. This ensures you always have an up-to-date record of unpaid and paid invoices.
If you have Auto Sync disabled, you’ll need to export your invoices, along with your expense reports, manually. Follow these three simple steps:
- Filter Invoices: From your Reports page, use filters to find the invoices you want to export.
- Select Invoices: Pick the invoices ready for export.
- Export to NetSuite: Click Export to NetSuite in the top right-hand corner.
When exporting to NetSuite, we match the recipient’s email address on the invoice to a customer record in NetSuite. This means that each customer in NetSuite must have an email address in their profile. If we can’t find a match, we’ll create a new customer in NetSuite.
Once exported, the invoice will appear in the Accounts Receivable account you selected during your NetSuite Export configuration.
Updating the status of an invoice to “Paid”
When you mark an invoice as Paid in Expensify, this status will automatically update in NetSuite. Similarly, if the invoice is marked as Paid in NetSuite, it will sync with Expensify. The payment will be reflected in the Collection account specified in your Advanced Settings Configuration.
Download NetSuite Logs
Sometimes, we might need more details from you to troubleshoot issues with your NetSuite connection. Providing the NetSuite web services usage logs is incredibly useful.
Here’s how you can send them to us:
- Generate the Logs: Start by trying to export a report from your system. This action will create the most recent logs that we require.
- Access Web Services Usage Logs: You can locate these logs in your NetSuite account. Just use the global search bar at the top of the page and type
Web Services Usage Log. - Identify the Logs: Look for the most recent log entry. You should see
FAILEDunder theSTATUScolumn. Click the two blue view links under theREQUESTandRESPONSEcolumns. These are the two .xml files to review.
FAQ
How does Auto Sync work with reimbursed reports?
If a report is reimbursed via ACH or marked as paid in Expensify and then exported to NetSuite, the report is automatically marked as paid in NetSuite during the next sync.
If a report is exported to NetSuite and then marked as paid in NetSuite, the report is automatically marked as paid in Expensify during the next sync.
If I enable Auto Sync, what happens to existing approved and paid reports?
If you previously had Auto Sync disabled but want to allow that feature to be used going forward, you can safely turn it on without affecting existing reports. Auto Sync will only take effect for reports created after enabling that feature.
Why are some of my customers not importing from NetSuite?
If only part of your customer list is importing from NetSuite to Expensify, ensure your page size is set to 1000 for importing customers and vendors:
- Navigate to Setup > Integration > Web Services Preferences > Search Page Size
- Adjust this setting to 1000
- Sync your connection again under Settings > Workspaces > Group > Workspace Name > Accounting
Additionally, ensure the Company Name field is completed for each customer profile; otherwise, they won’t import into the Group Workspace.
Why aren’t all my Categories pulling into Expensify from NetSuite?
If you’re having trouble importing your Categories, you’ll want to start by checking that they are set up in NetSuite as actual Expense Categories, not General Ledger accounts:
- Log in to NetSuite as an administrator and go to Setup > Accounting > Expense Categories
- A list of Expense Categories should be available
- If no Expense Categories are visible, click New to create new Expense Categories
If you have confirmed that your categories are set as Expense Categories in NetSuite and they still aren’t importing to Expensify, make sure that the subsidiary of the Expense Category matches the subsidiary selected in your connection settings.
What’s the difference between a Custom Segment, Custom Record, and Custom List?
- Custom Record: This is an entirely customizable record type used to store detailed, structured information not covered by standard NetSuite records (e.g., customers, vendors, and transactions). Unlike Segments, Custom Records are designed to manage standalone data, like tracking projects, assets, or other entities.
- Custom Segment: A custom classification field similar to standard NetSuite segments like Department, Class, or Location. Typically used when you need to categorize transactions, records, or GL entries for reporting purposes or to separate financial. (NetSuite automatically creates a Custom Record behind the scenes to power the segment.)
- Custom List: A static dropdown of predefined values used for simple selections, like Preferred Contact Method. Custom Lists are lightweight and don’t support complex relationships or GL impacts.