


Manage Company Cards
Assigning company cards in Expensify ensures employees can seamlessly track business expenses, while administrators maintain accurate transaction records. This guide explains how to assign, manage, and unassign company cards to keep your expense management streamlined
Main Uses
- Streamlined Expense Tracking: Automatically import credit card transactions to ensure accurate reporting and reconciliation.
- Flexible Connection Options: Connect cards via direct bank connections, commercial feeds, or CSV uploads.
- Centralized Management: Simplify administration of company cards and individual expenses within Expensify.
Core Users
- Domain Admins: Manage credit card connections and assignments across the organization.
- Employees: Track and manage their assigned card transactions.
- Finance Teams: Ensure accurate reporting and reconciliation of expenses.
Advantages
- Automation: Reduce manual entry with automatic imports for supported card programs.
- Compatibility: Support for major banks and custom CSV uploads for unsupported cards.
- Control: Assign, manage, and configure credit cards in one central place.
Key Concepts
Direct Bank Connections
A direct bank connection links Expensify to your bank for automatic transaction imports.
- Supported Banks: Includes major institutions like Chase, Amex, Citibank, Wells Fargo, and others.
- Credentials: Requires master administrative login credentials.
- Import History: Banks typically provide 30-90 days of historical transactions.
- Troubleshooting: If your connection fails, ensure your bank login credentials are correct and security questions are up to date. Disable two-factor authentication temporarily if necessary, as Expensify cannot bypass it. Use the “Fix Card” option in Settings > Domains > [Domain Name] > Company Cards to resolve issues.
Commercial Card Feed
A commercial card feed is a direct connection between Expensify and your bank for reliable daily transaction imports.
- Supported Networks: Visa, Mastercard, and American Express.
- Setup: Initiated by your bank and configured in Expensify.
- Advantages: More stable and not affected by changes to login credentials.
- Deep Dive: For Mastercard, use the Common Data File (CDF) format; for Visa, enable the Variant Call Format (VCF). American Express requires specific forms. Ensure you provide accurate distribution IDs and start dates during setup to avoid data gaps.
CSV Upload
A CSV upload is a manual method for importing credit card transactions into Expensify.
- File Formats: Accepts CSV, OFX, QFX, or XLS files.
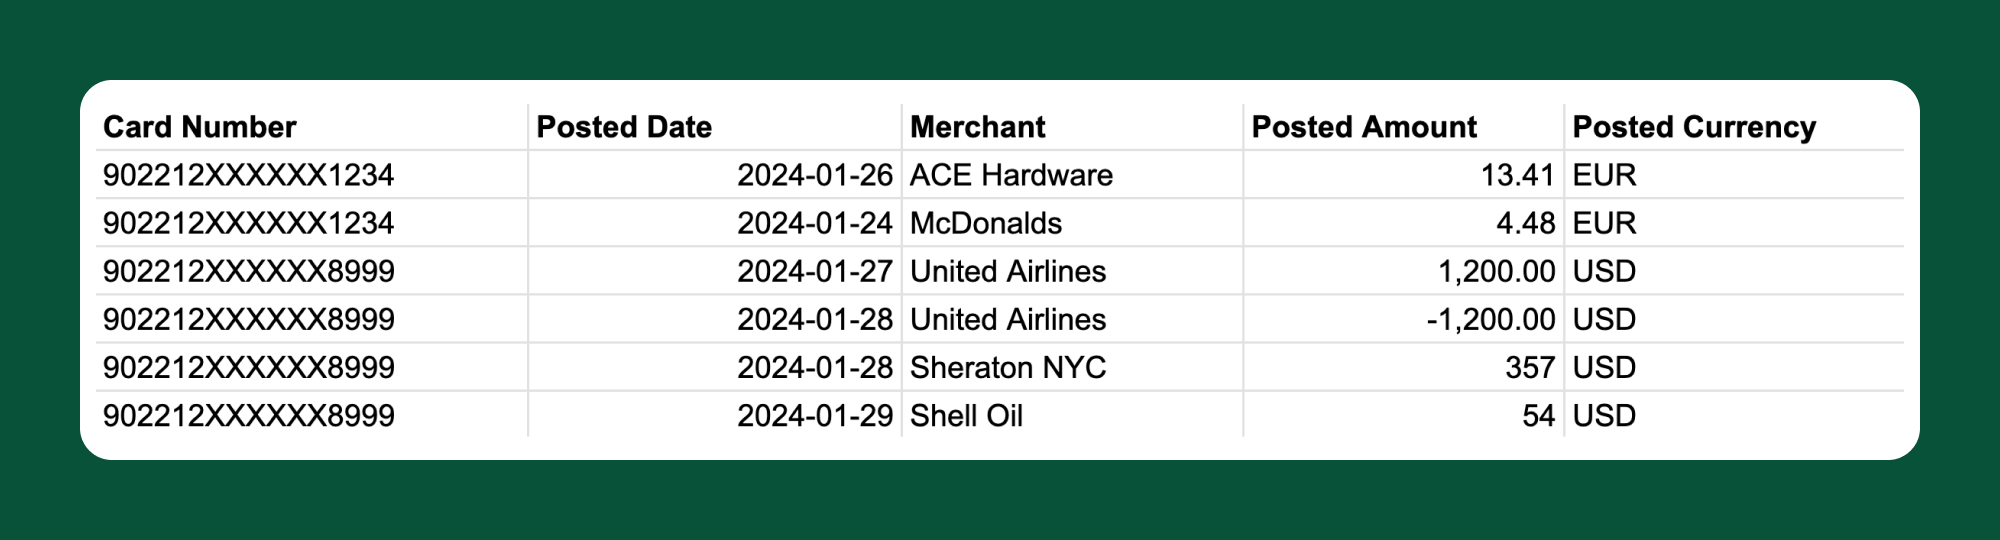
- Minimum Required Fields: Includes card number, date, merchant, amount, and currency.
- Use Case: Ideal for unsupported banks or importing older transactions.
- Common Issues: If you encounter errors such as “Attribute value mapping is missing,” ensure all required fields are included and formatted correctly. Use Expensify’s CSV template as a guide.
Direct Connection: How do I connect credit cards via direct bank connection?
- Go to Settings > Domains > [Domain Name] > Company Cards.
- Click Import Card.
- Select your card issuer and enter the master administrative login credentials.
- Assign accounts to cardholders.
- Set a start date to determine which transactions will appear.
Commercial Card Feed: How do I set up a commercial card feed?
Mastercard
- Contact your bank and request a Common Data File (CDF) feed for Expensify.
- Provide the desired start date for transaction imports.
- Submit the distribution ID to Expensify via the submission form.
- Expensify will notify you once the feed is enabled.
Visa
- Request a Variant Call Format (VCF) feed for Expensify from your bank.
- Obtain the feed file name or raw file information.
- Submit the file details via the submission form.
American Express
- Complete the required Amex forms.
- Email the forms to American Express.
- Submit the feed details provided by American Express to concierge@expensify.com.
CSV Upload: How do I import credit card transactions using a CSV?
- Download your card transactions from your bank in CSV, OFX, QFX, or XLS format.
- Format the CSV for upload using this template as a guide – be sure to include the card number, date, merchant, amount, and currency.
- You can also add mapping for Categories and Tags, but those parameters are optional.
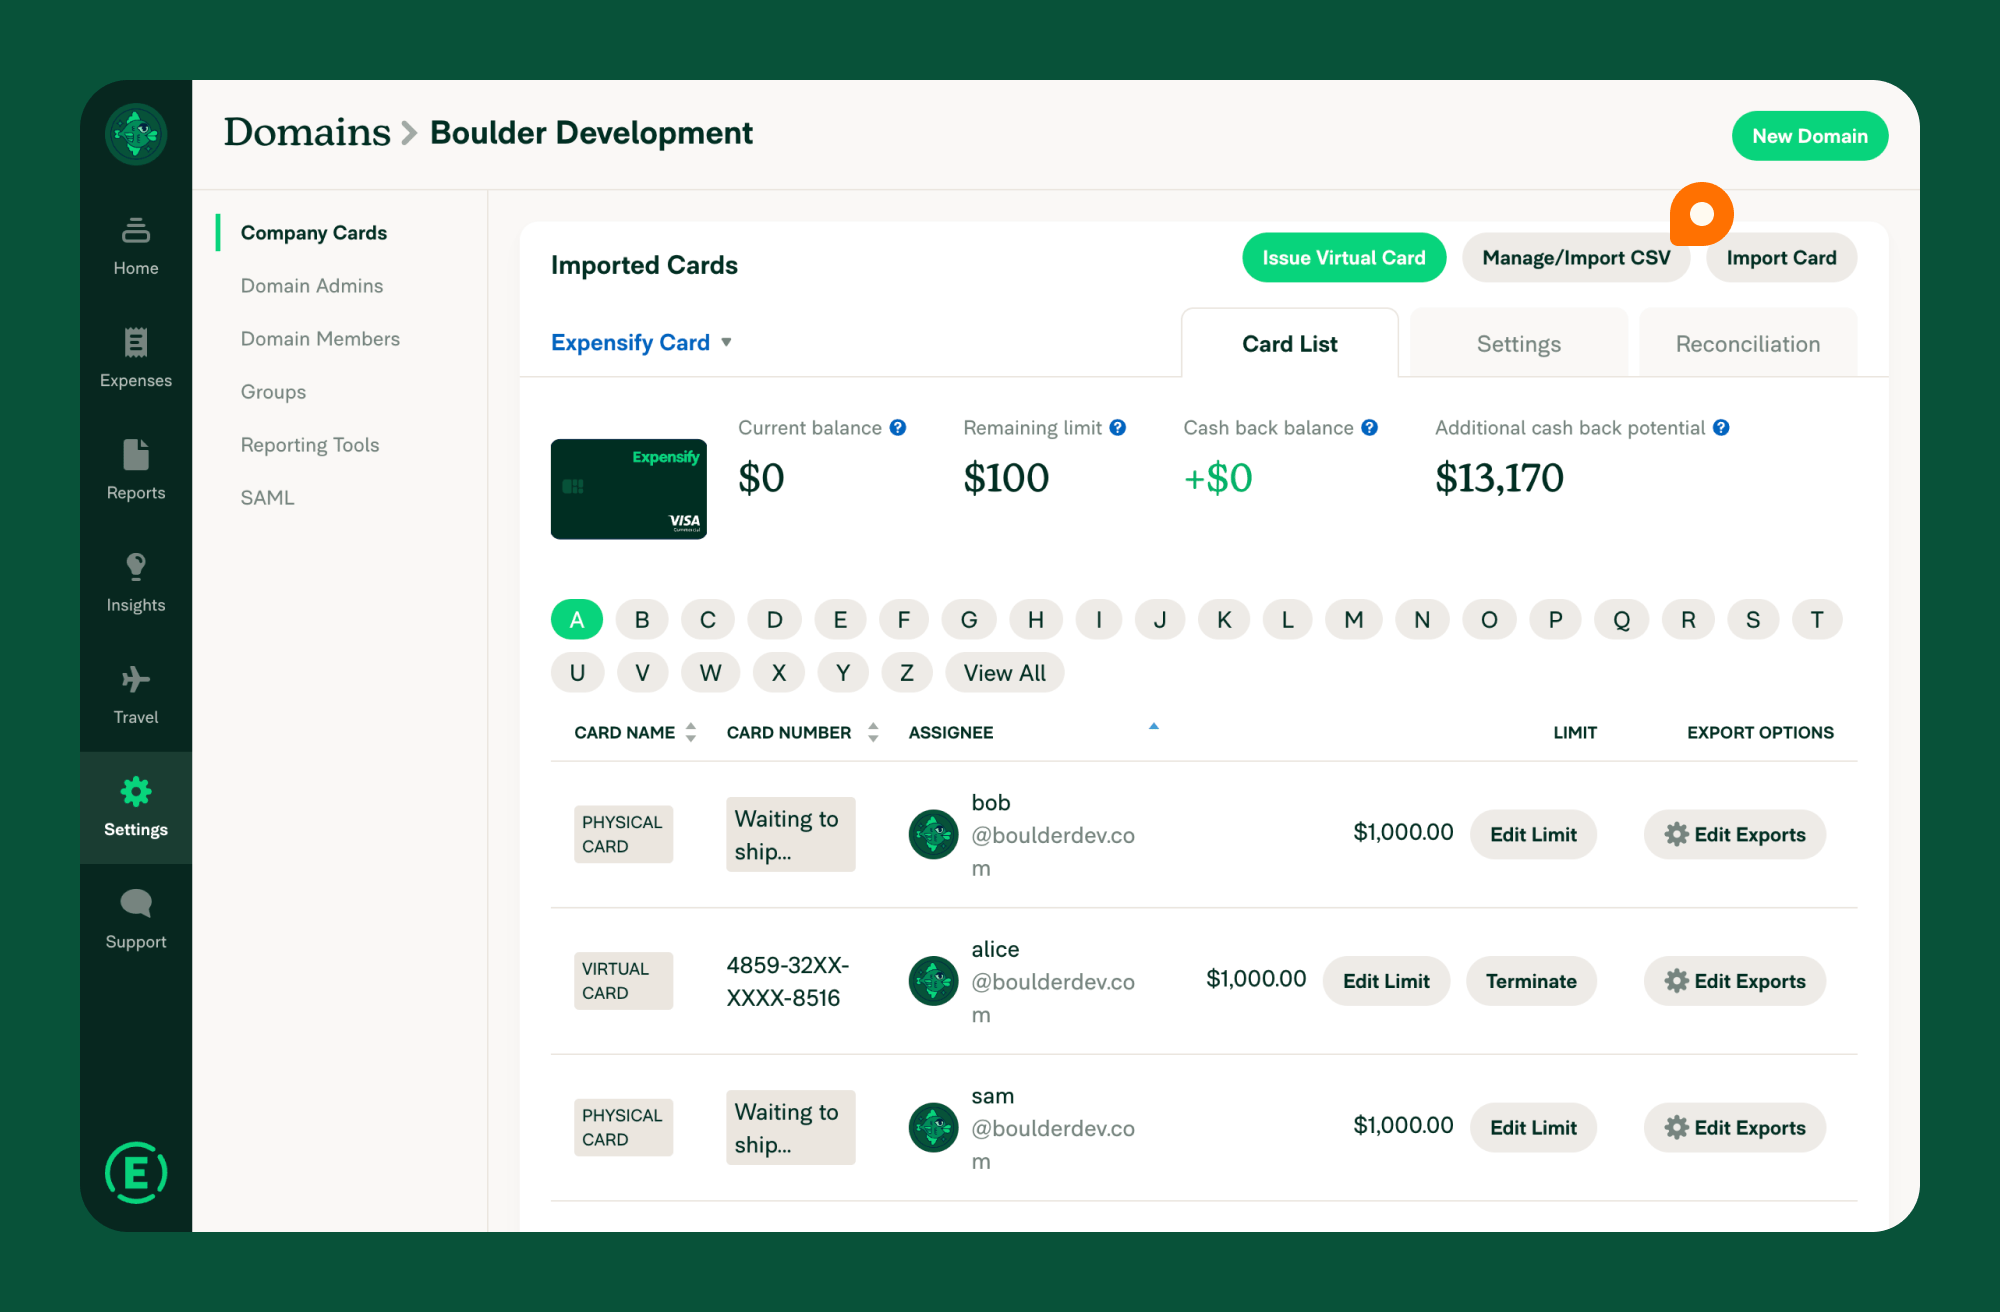
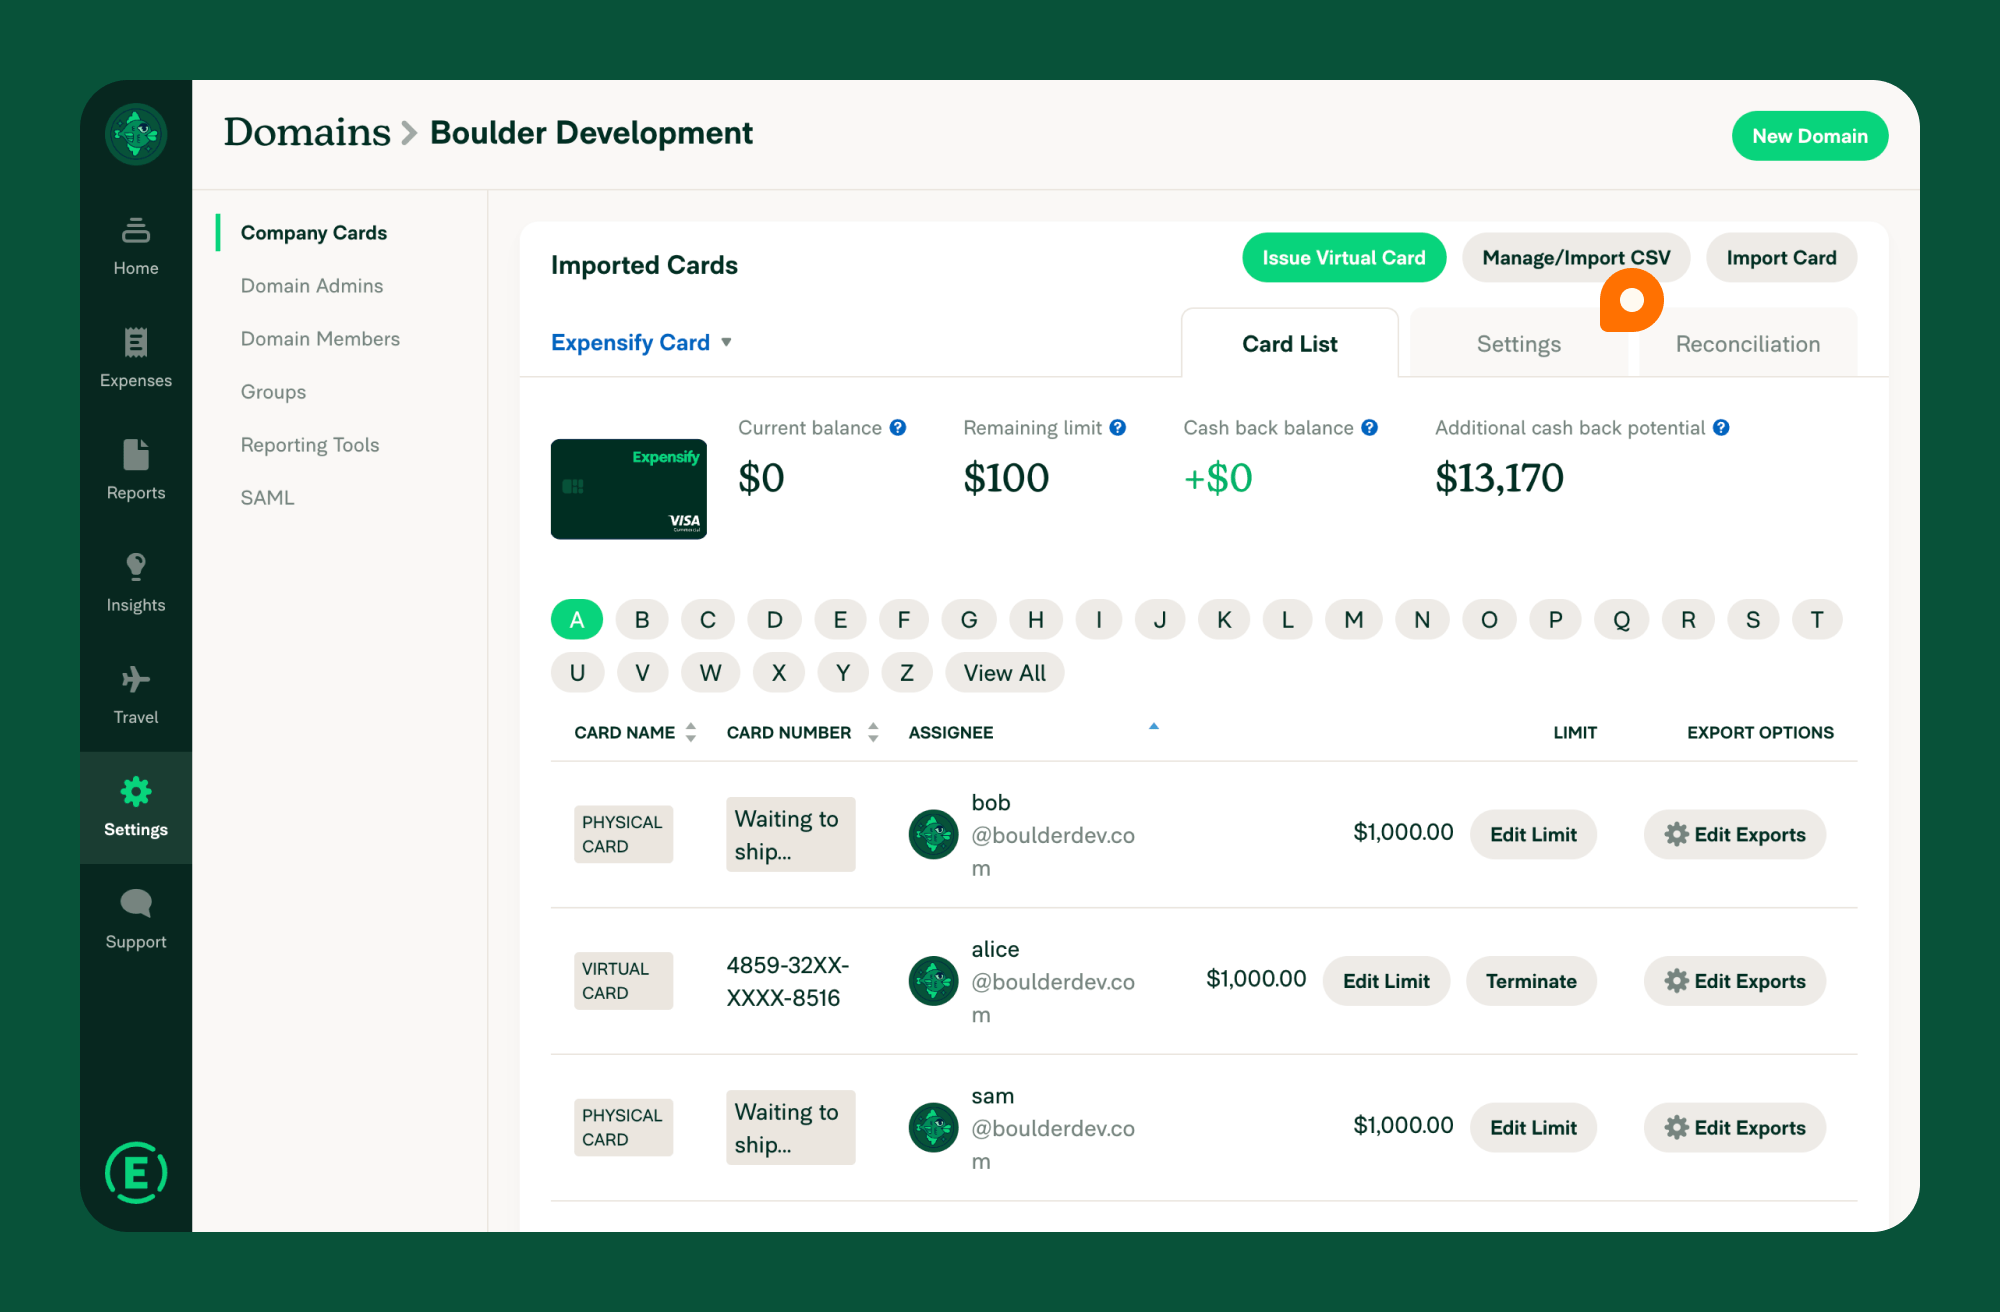
- Go to Settings > Domains > [Domain Name] > Company Cards > Manage/Import CSV.
- Upload the file and map the fields to Expensify’s requirements.
- Review the Output Preview for errors and submit the file.
Assign Cards: How do I assign cards to employees?
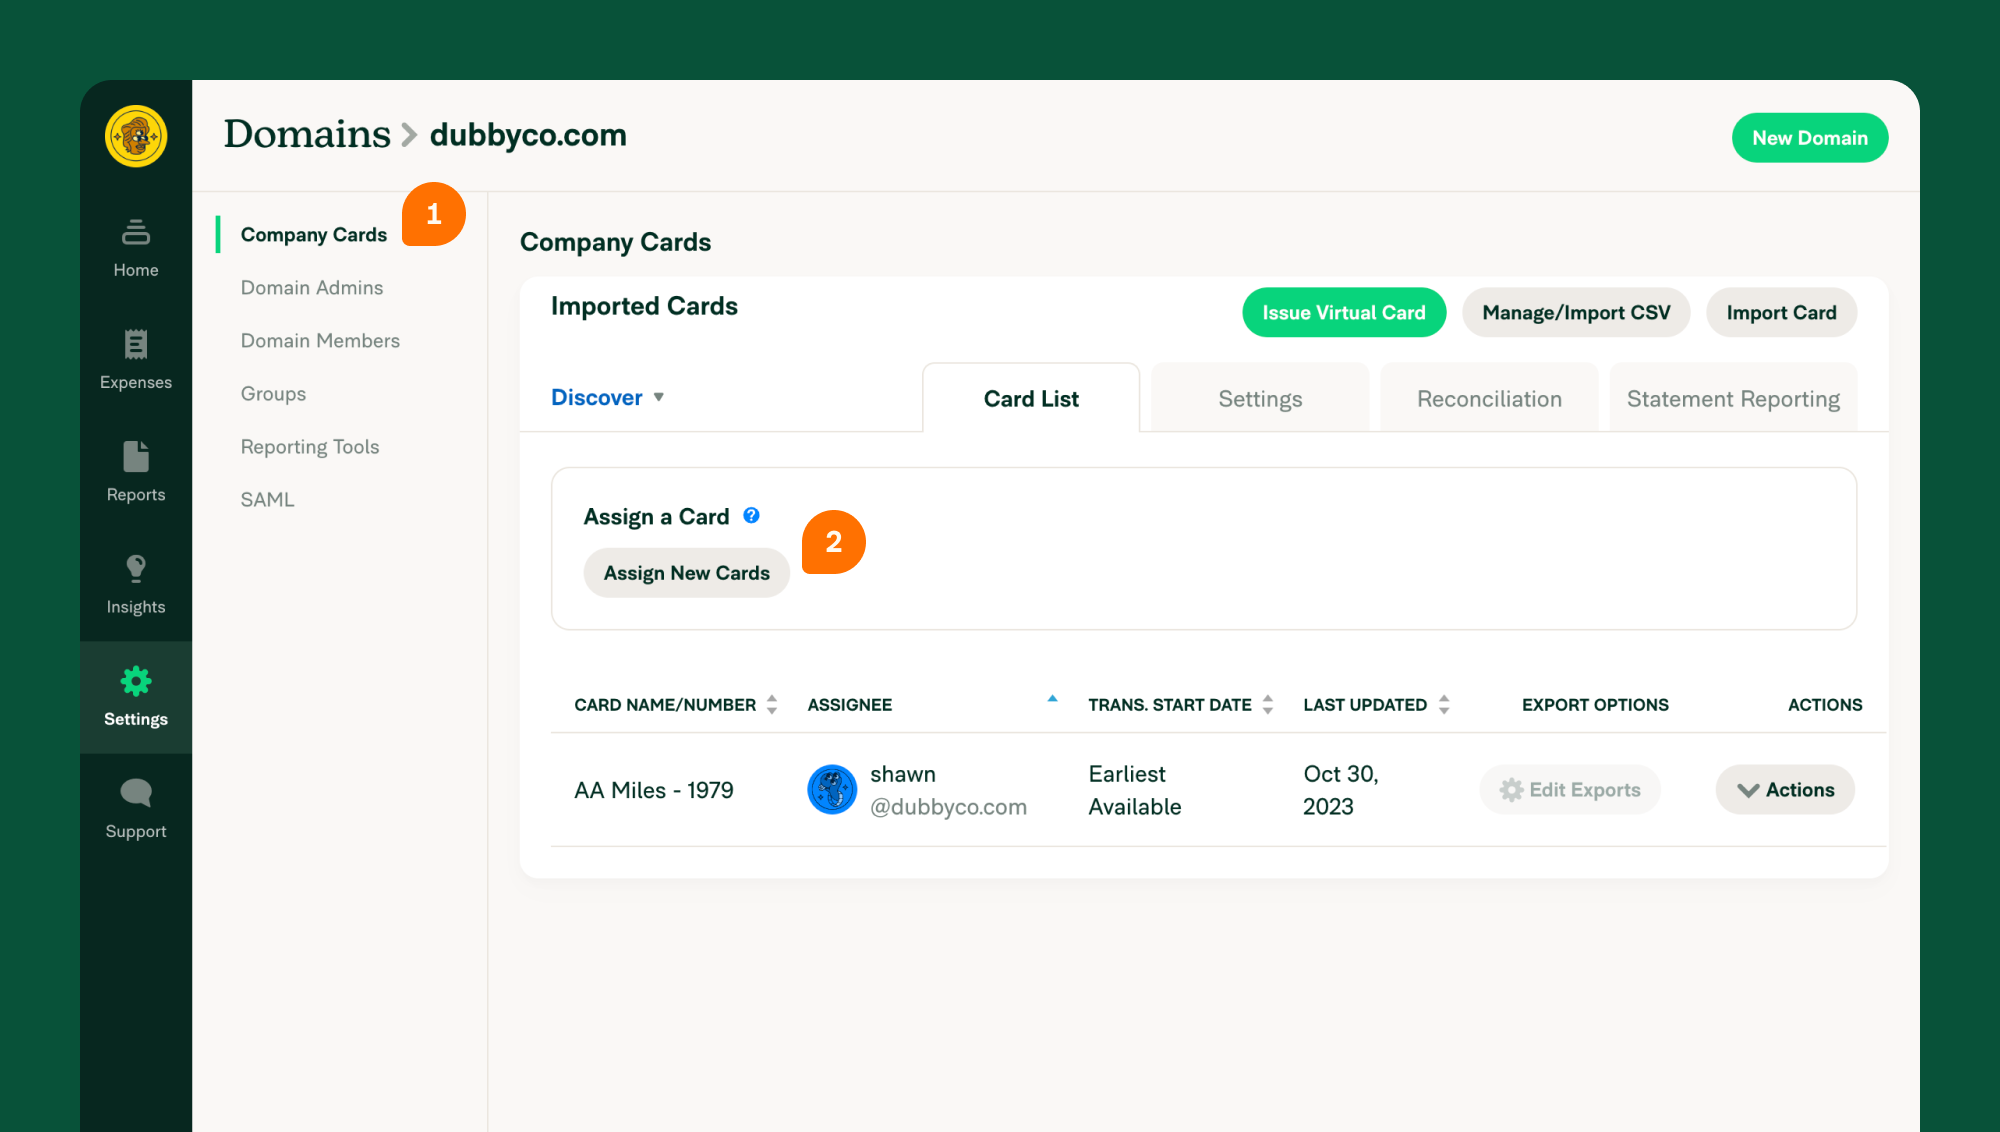
- Go to Settings > Domains > [Domain Name] > Company Cards.
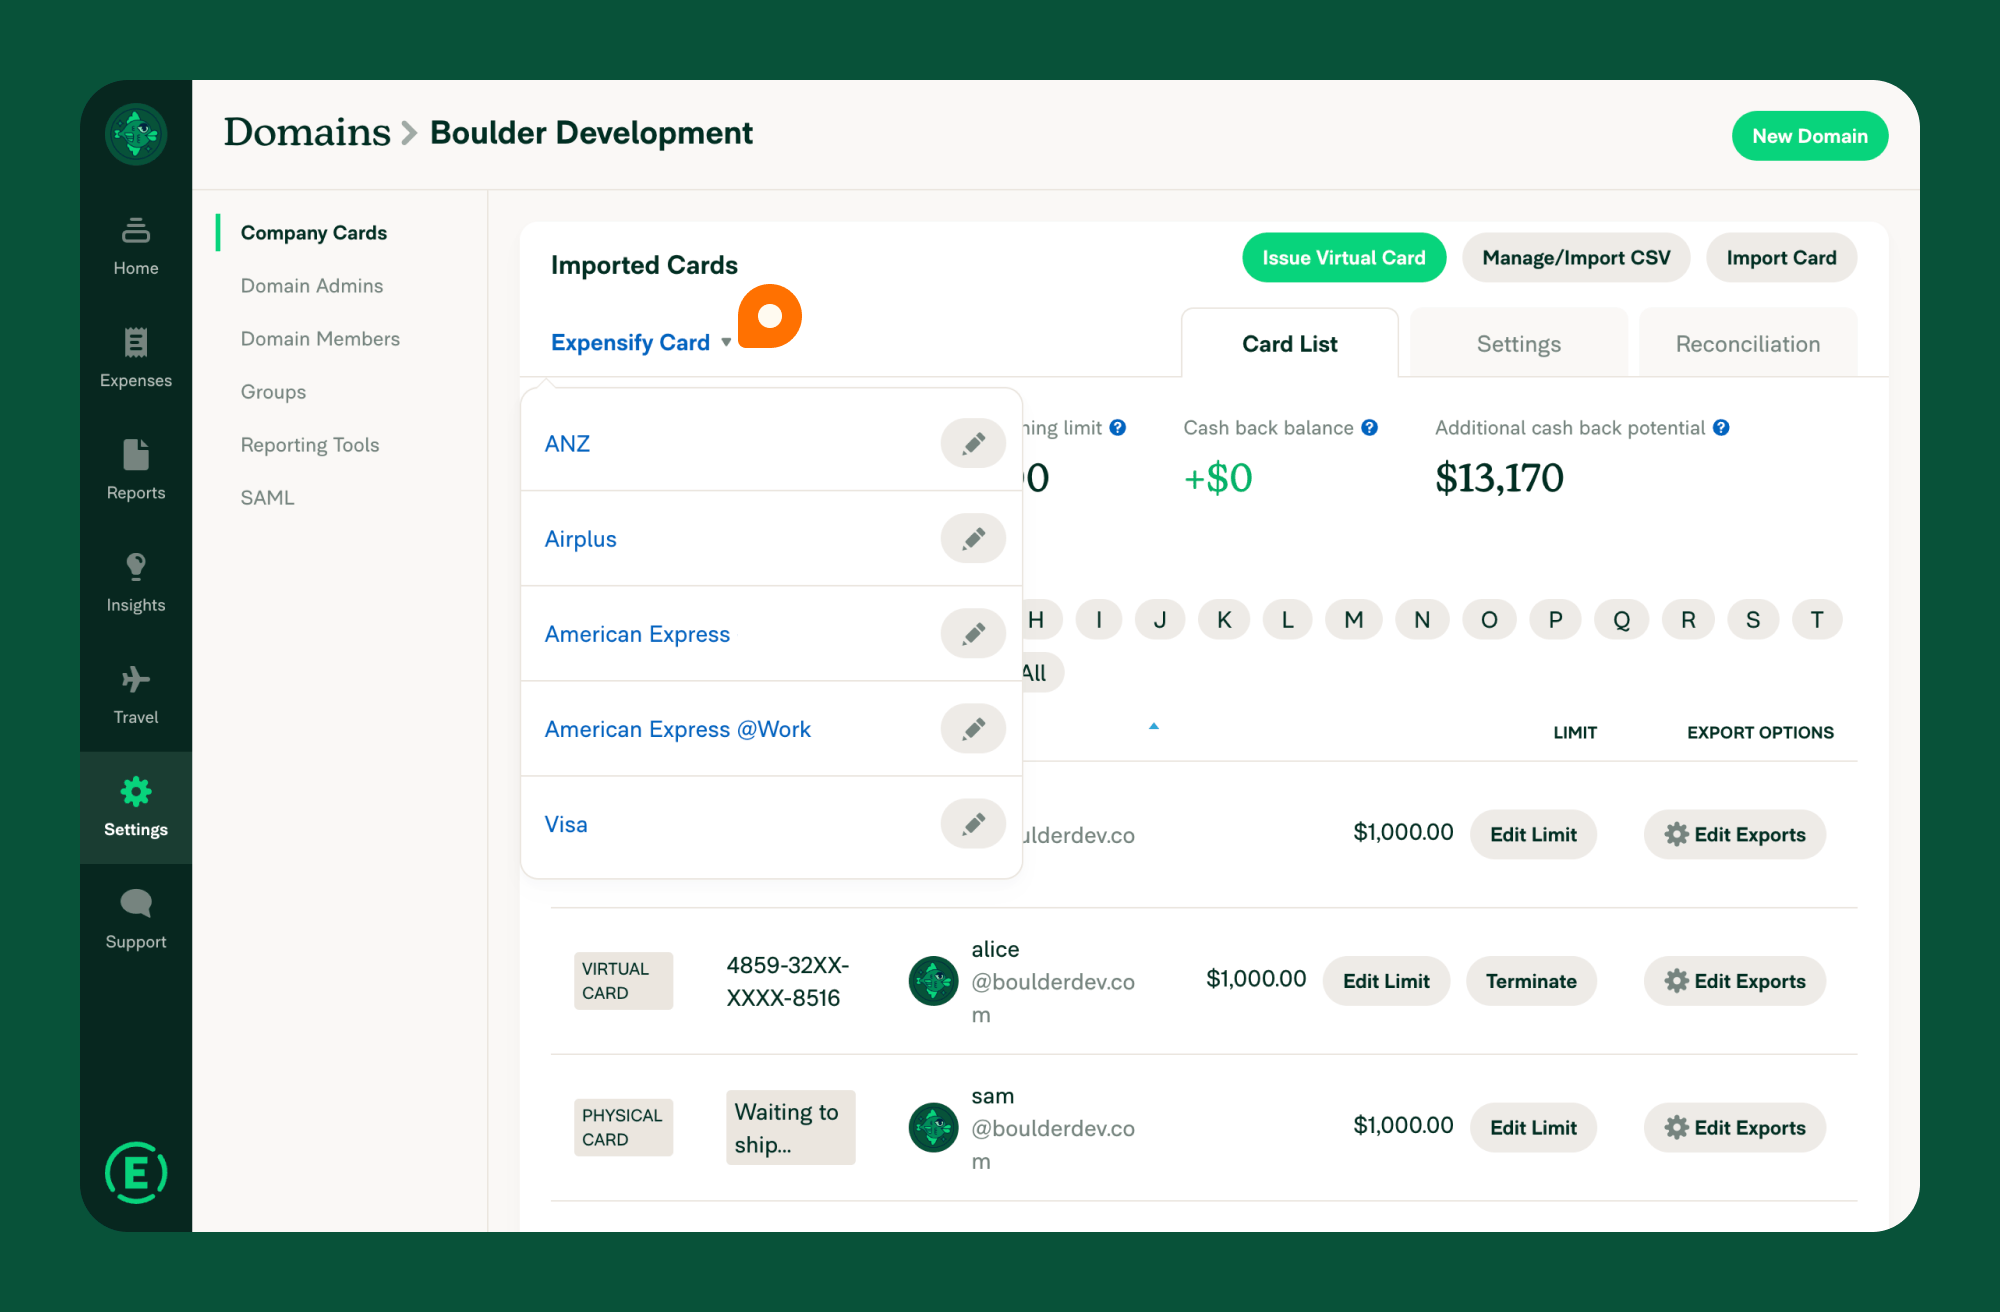
- Select the card feed from the dropdown list.
- Click Assign New Cards, enter the member’s email address and select the card number.
- (Optional) Set a transaction start date.
- Click Assign to complete the process.
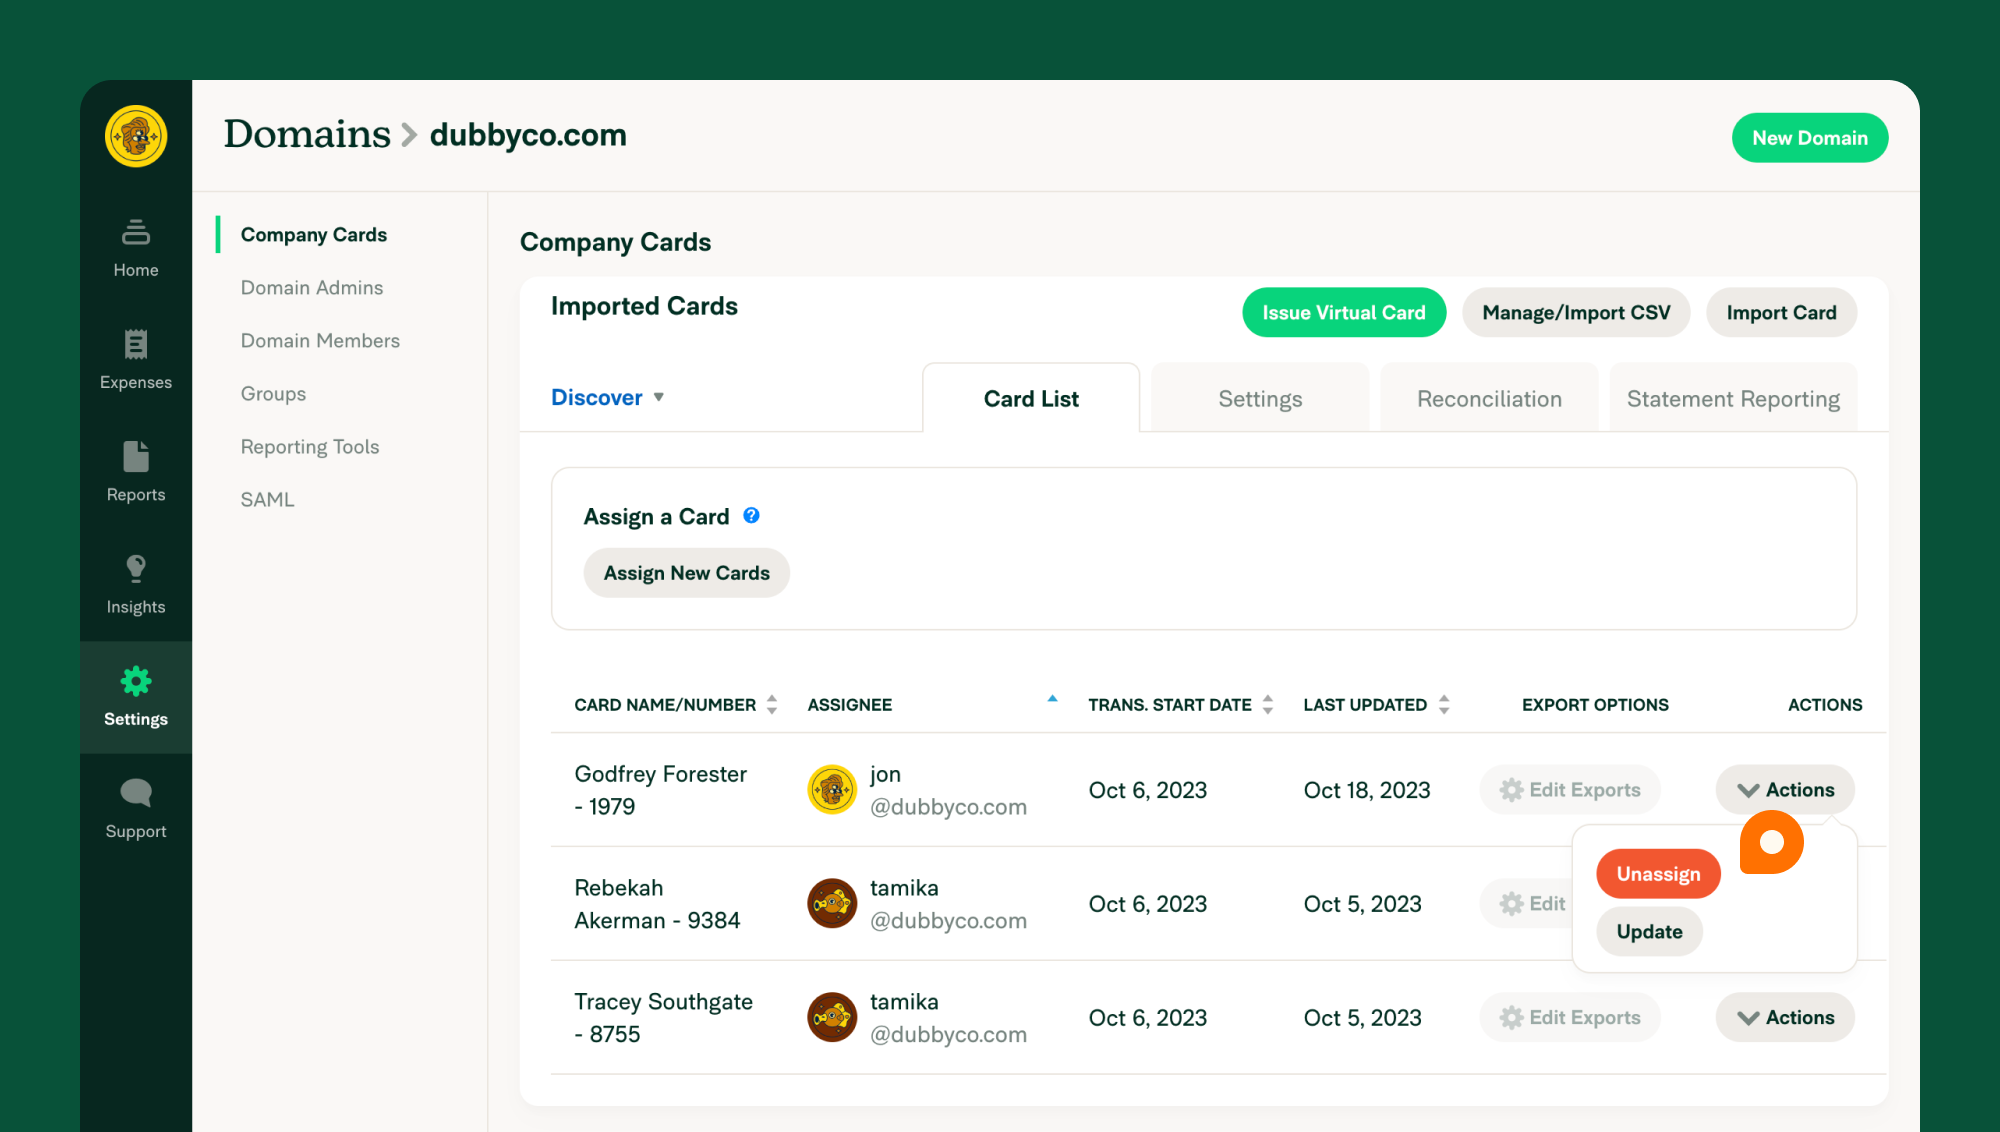
Unassign Cards: How do I unassign cards?
- Go to Settings > Domains > [Domain Name] > Company Cards.
- Locate the card and click Actions > Unassign.
- (Optional) To remove the card feed, unassign all associated cards and refresh the page.
Note: Unassigning a card deletes all open or unreported expenses linked to it.
Configure Company Card Settings
- Go to Settings > Domains > [Domain Name] > Company Cards > Settings.
- Adjust preferences for:
- Preferred Workspace: Ensures transactions are reported to a specific workspace.
- Reimbursable Preference: Controls whether expenses are flagged as reimbursable or non-reimbursable.
- Liability Type: Set the corporate or personal liability settings for company card expenses. Corporate liability prevents users from deleting company card expenses, while personal liability allows users to manage and delete their company card expenses.
- Save the settings to apply changes.
Export Company Card Expenses to a Connected Accounting Integration: Centralized General Ledger Account
For businesses using accounting integrations like QuickBooks or NetSuite, connect the cards to export expenses to specific general ledger (GL) accounts via the “Edit Exports” option.
To export credit card expenses to a pooled GL account:
- Navigate to Settings > Workspaces.
- Select the appropriate Workspace.
- Open the Connections tab.
- Under Accounting Integrations, click Configure next to the relevant integration.
- In the Non-reimbursable Export section, select Credit Card / Charge Card / Bank Transaction.
- Review the Export Settings page to ensure proper expense report export to NetSuite.
- Choose the Vendor/Liability Account for exporting all non-reimbursable expenses.
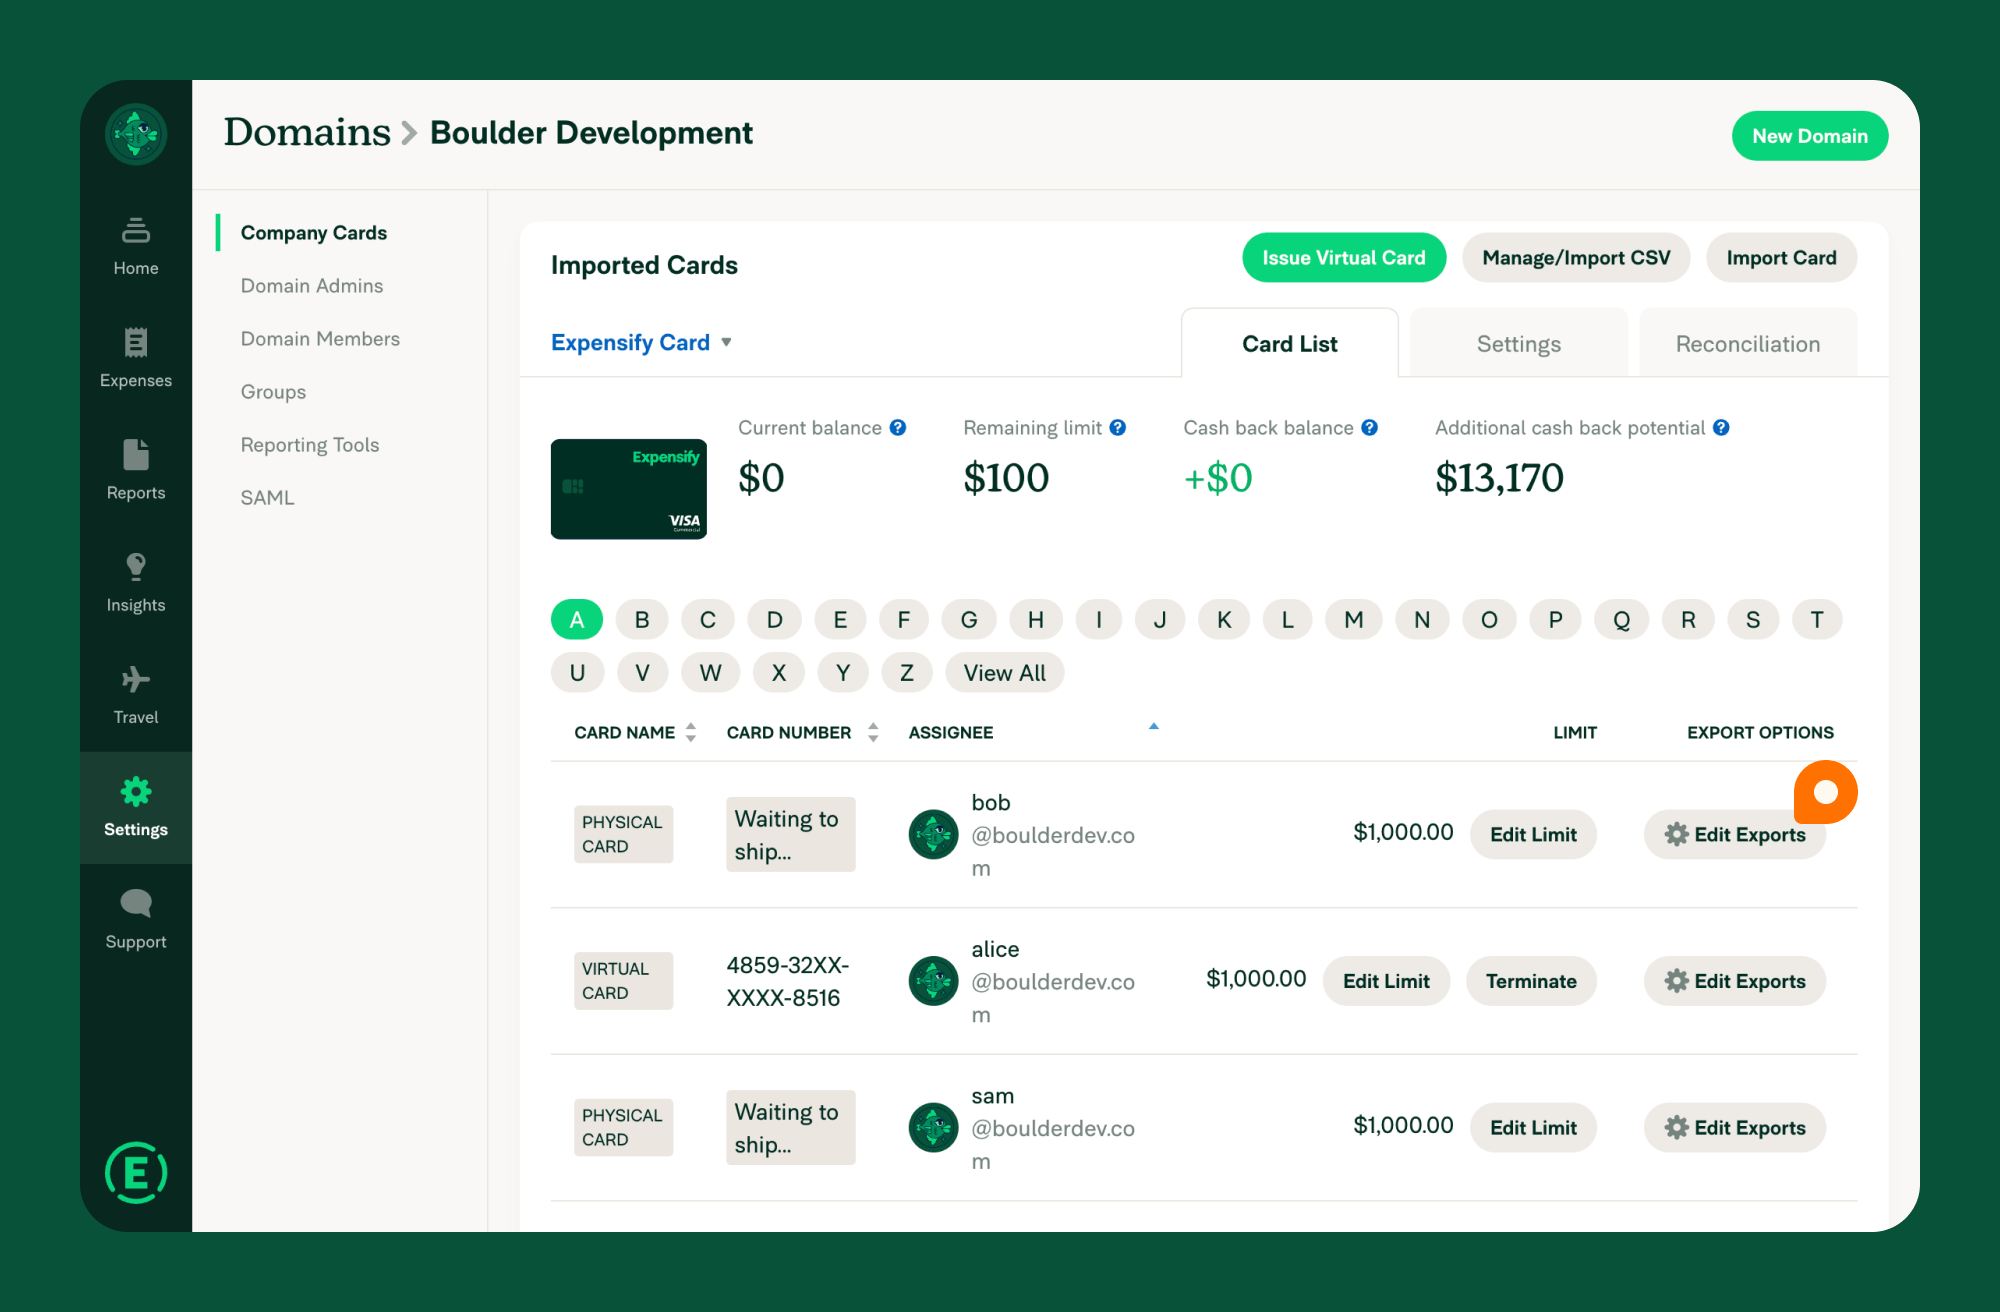
Exporting to Individual General Ledger Accounts
- Navigate to Settings > Domains.
- Select the appropriate Domain.
- Click Edit Exports next to the relevant card.
- Select the General Ledger (GL) Account for expense exports.
FAQ
Why are some transactions missing?
Transactions may take up to 24 hours to post. Update the card feed or check the Reconciliation Dashboard to review transaction data.
- Reconciliation Dashboard: Navigate to Settings > Domains > [Domain Name] > Company Cards > Reconciliation to identify missing or unapproved expenses within a specific timeframe.
- Common Issues: Ensure the transaction date range is correct. If gaps persist, contact Concierge to request a historical data update.
Which is better, a direct bank connection or commercial card feed?
Commercial feeds are more stable and reliable but require setup by your bank. Direct connections are easier to set up but may experience occasional disruptions.
What should I do if my CSV upload fails or results in an error?
Ensure the file includes the required fields and matches the formatting guidelines. Use Expensify’s CSV template for reference.
What happens when I unassign a card?
Unassigning a card deletes all draft or unreported expenses linked to it. Submitted or processed expenses remain unaffected.
Why is my card connection broken?
Check for changes to bank credentials, security questions, or login details. Update the information in Expensify and re-establish the connection via Fix Card.
How far back can I import transactions?
Most banks provide 30-90 days of historical data. Older transactions can be imported using the CSV upload method.